Embed Size (px)
Citation preview
Cuiseurs faible consommation en bois et cuiseurs solaires
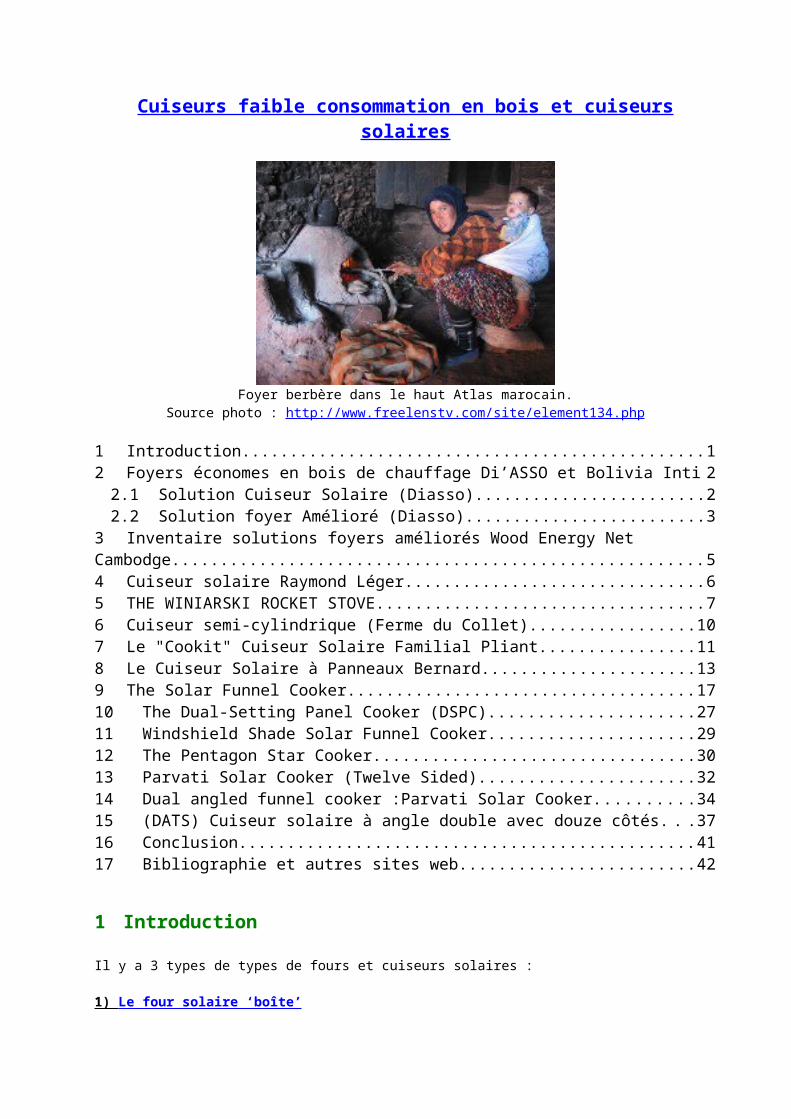
Foyer berbère dans le haut Atlas marocain.Source photo : http://www.freelenstv.com/site/element134.php
1 Introduction.............................................................................................................................12 Foyers économes en bois de chauffage Di’ASSO et Bolivia Inti............................................2
2.1 Solution Cuiseur Solaire (Diasso)...................................................................................22.2 Solution foyer Amélioré (Diasso)....................................................................................3
3 Inventaire solutions foyers améliorés Wood Energy Net Cambodge......................................54 Cuiseur solaire Raymond Léger..............................................................................................65 THE WINIARSKI ROCKET STOVE....................................................................................76 Cuiseur semi-cylindrique (Ferme du Collet).........................................................................107 Le "Cookit" Cuiseur Solaire Familial Pliant.........................................................................118 Le Cuiseur Solaire à Panneaux Bernard................................................................................139 The Solar Funnel Cooker.......................................................................................................1710 The Dual-Setting Panel Cooker (DSPC)...........................................................................2711 Windshield Shade Solar Funnel Cooker............................................................................2912 The Pentagon Star Cooker.................................................................................................3013 Parvati Solar Cooker (Twelve Sided)................................................................................3214 Dual angled funnel cooker :Parvati Solar Cooker.............................................................3415 (DATS) Cuiseur solaire à angle double avec douze côtés.................................................3716 Conclusion.........................................................................................................................4117 Bibliographie et autres sites web.......................................................................................42
1 Introduction
Il y a 3 types de types de fours et cuiseurs solaires :
1) Le four solaire ‘boîte’
très pratique: préparez le plat chargez le four et oubliez-le pendant 2 à 3 heures. Rien ne colle rien ne déborde.
sert comme plaque et comme four facile à construire à base de matériaux disponibles partout au monde ne permet pas de préparer les repas de dernière minute
capacité limitée

2) Le cuiseur solaire à réglage manuel (en général du type parabole)
puissant: deux heures suffisent au modèle SK14 pour bouillir 12l d’eau en été. comparable à une plaque de cuisine il faut régler la position toutes les 30 minutes
ça peut déborder et coller (la personne qui surveille travaille en plein soleil)
3) Le cuiseur solaire à réglage automatique
Systèmes très puissants: typiquement appliqués pour des écoles et hôpitaux en Afrique et en Inde
Mécanisme sophistiqué suit le soleil il faut une formation spéciale pour la construction prix non négligeable
Dans la suite du document, nous allons présenter les différents modèles présentés sur Internet.Note : par manque de temps, certaines parties n’ont pas été encore traduites.
2 Foyers économes en bois de chauffage Di’ASSO et Bolivia Inti
Selon les remarques de Monsieur Wadi Baudri (Maroc), il serait intéressant de voir comment promouvoir les foyers consommant peu de bois ou n’en consommant pas (foyers solaires). L’idée serait d’installer dans la région des fabriques de fours / foyers économes en bois de chauffage (initiative malheureusement déjà tenté sans succès ici. Source : N. Montès). Des ONG françaises proposent plusieurs solutions de foyers (y compris foyers solaires), évitant le gaspillage du bois du feux : a) DIA'SSO , Hélène et Damien Houdayer-Bonnet, 20 rue de la Fuie, 72220 Laigné en Belin, France, e-mail : [email protected] (http://www.diasso.org/ , cuiseurs solaires, foyers améliorés). Raymond,Lors de la conférence, ils ont beaucoup parlé de DIA'SSO en Afrique de l'Ouest. Diasso, en collaboration avec différents partenaires (Bolivia Inti), participe à la mise en place d’un programme d’appui technique pour l’Association Écologiste pour le Développement Social (AEDS) de Ouagadougou (Burkina Fasso) (source : http://www.diasso.org/init.htm ).
2.1 Solution Cuiseur Solaire (Diasso)
Voir aussi la solution très semblable de cuiseur solaire de l’association Bolivia Inti plus loin.
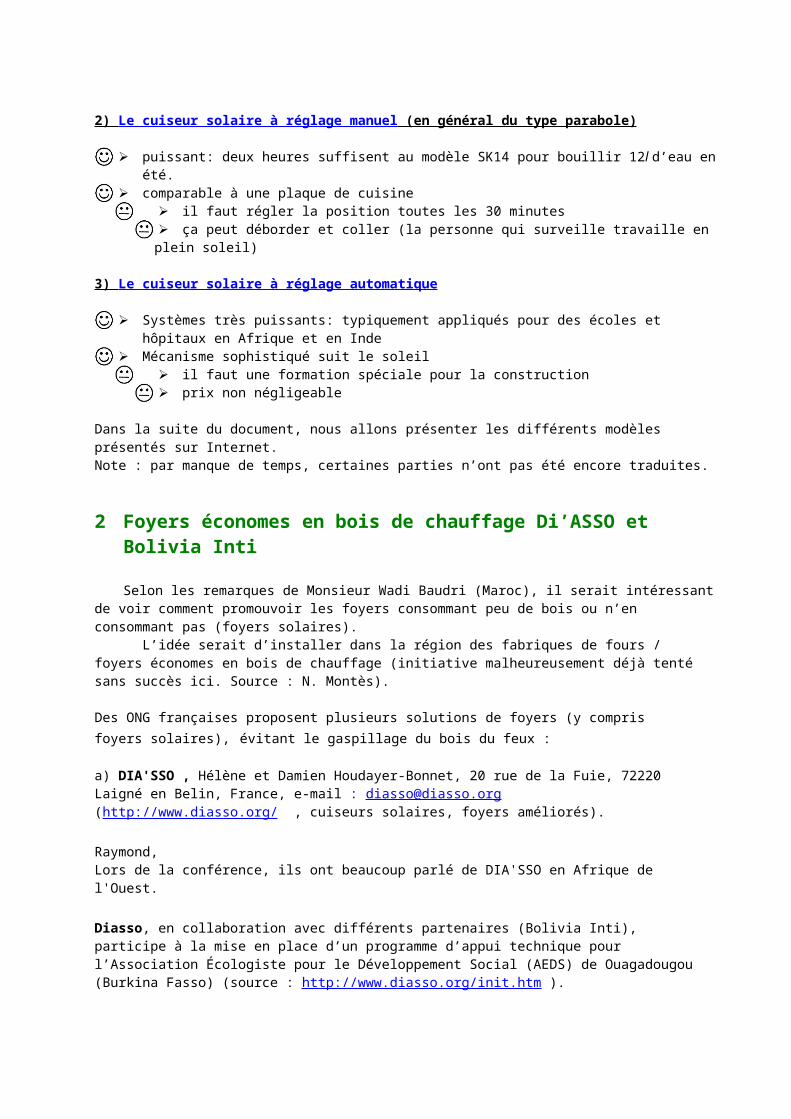
C’est une caisse (boîte) bien isolée dans laquelle on provoque un effet de serre par 2 vitres laissant passer la lumière du soleil, absorbée à l’intérieur par une tôle noir. La température peut atteindre plus de 170°C.Ce cuiseur permet toute sorte de cuisine (sauf la friture) : légumes, viandes, soupes, poisson, œufs, pains… Il fonctionne même par temps partiellement nuageux et ne demande qu’une orientation sommaire.
Tous les matériaux [pour ce cuiseur] sont achetés localement, AEDS prépare des kits, organise des stages de construction, où surtout des femmes viennent faire le montage de leur cuiseur. AEDS assure le suivi pendant plus d’un 1 an par l’organisation de réunion mensuelle.
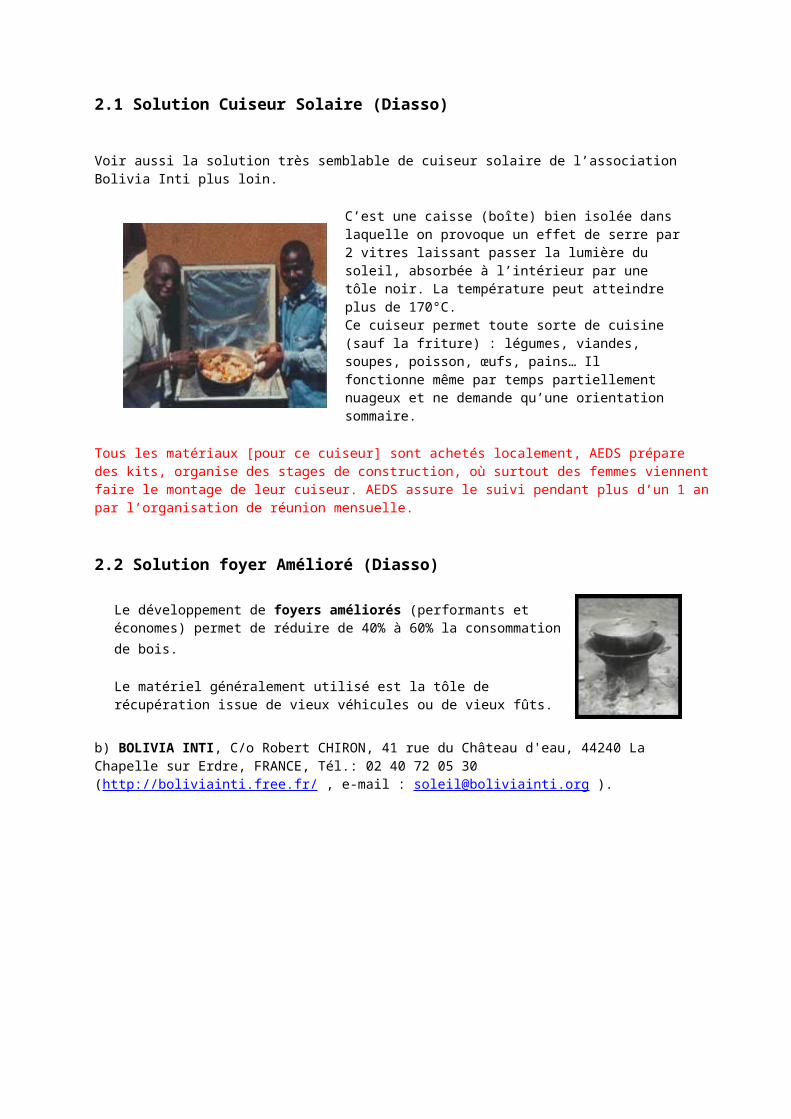
2.2 Solution foyer Amélioré (Diasso)
Le développement de foyers améliorés (performants et économes) permet de réduire de 40% à 60% la consommation de bois.
Le matériel généralement utilisé est la tôle de récupération issue de vieux véhicules ou de vieux fûts.
b) BOLIVIA INTI, C/o Robert CHIRON, 41 rue du Château d'eau, 44240 La Chapelle sur Erdre, FRANCE, Tél.: 02 40 72 05 30 (http://boliviainti.free.fr/ , e-mail : [email protected] ).
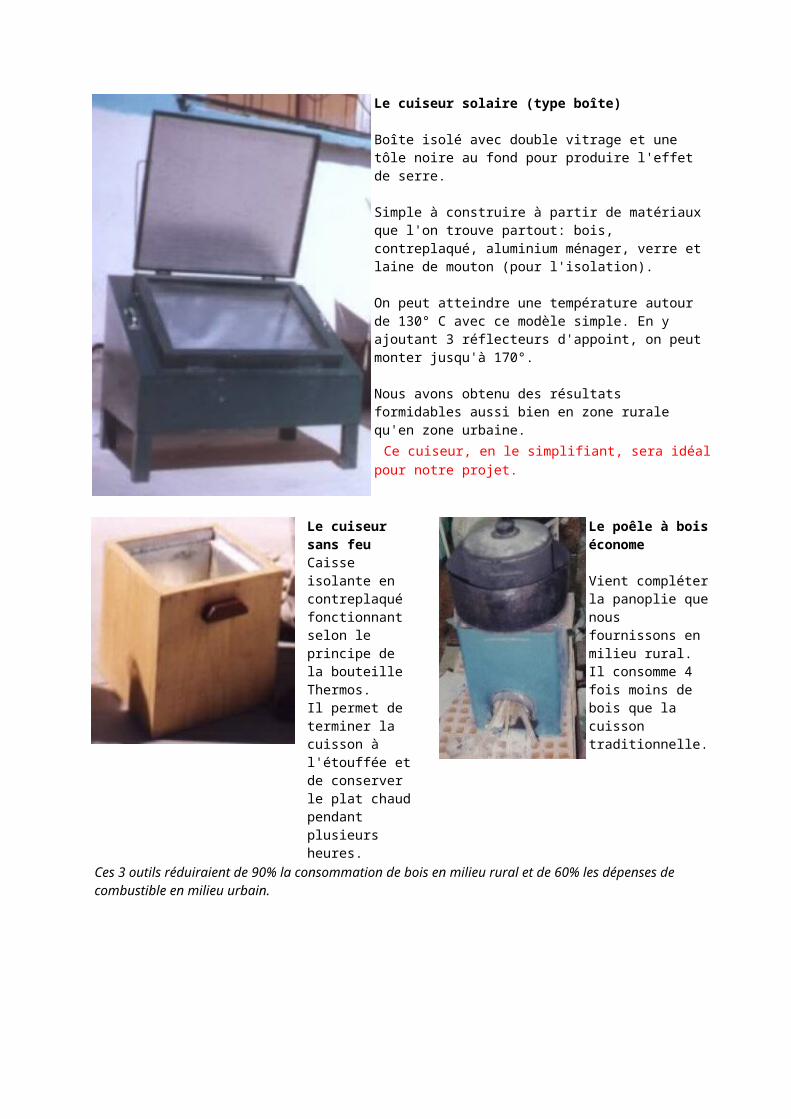
Le cuiseur solaire (type boîte) Boîte isolé avec double vitrage et une tôle noire au fond pour produire l'effet de serre. Simple à construire à partir de matériaux que l'on trouve partout: bois, contreplaqué, aluminium ménager, verre et laine de mouton (pour l'isolation). On peut atteindre une température autour de 130° C avec ce modèle simple. En y ajoutant 3 réflecteurs d'appoint, on peut monter jusqu'à 170°. Nous avons obtenu des résultats formidables aussi bien en zone rurale qu'en zone urbaine. Ce cuiseur, en le simplifiant, sera idéal pour notre projet.
Le cuiseur sans feuCaisse isolante en contreplaqué fonctionnant selon le principe de la bouteille Thermos. Il permet de terminer la cuisson à l'étouffée et de conserver le plat chaud pendant plusieurs heures.
Le poêle à bois économe Vient compléter la panoplie que nous fournissons en milieu rural. Il consomme 4 fois moins de bois que la cuisson traditionnelle.
Ces 3 outils réduiraient de 90% la consommation de bois en milieu rural et de 60% les dépenses de combustible en milieu urbain.
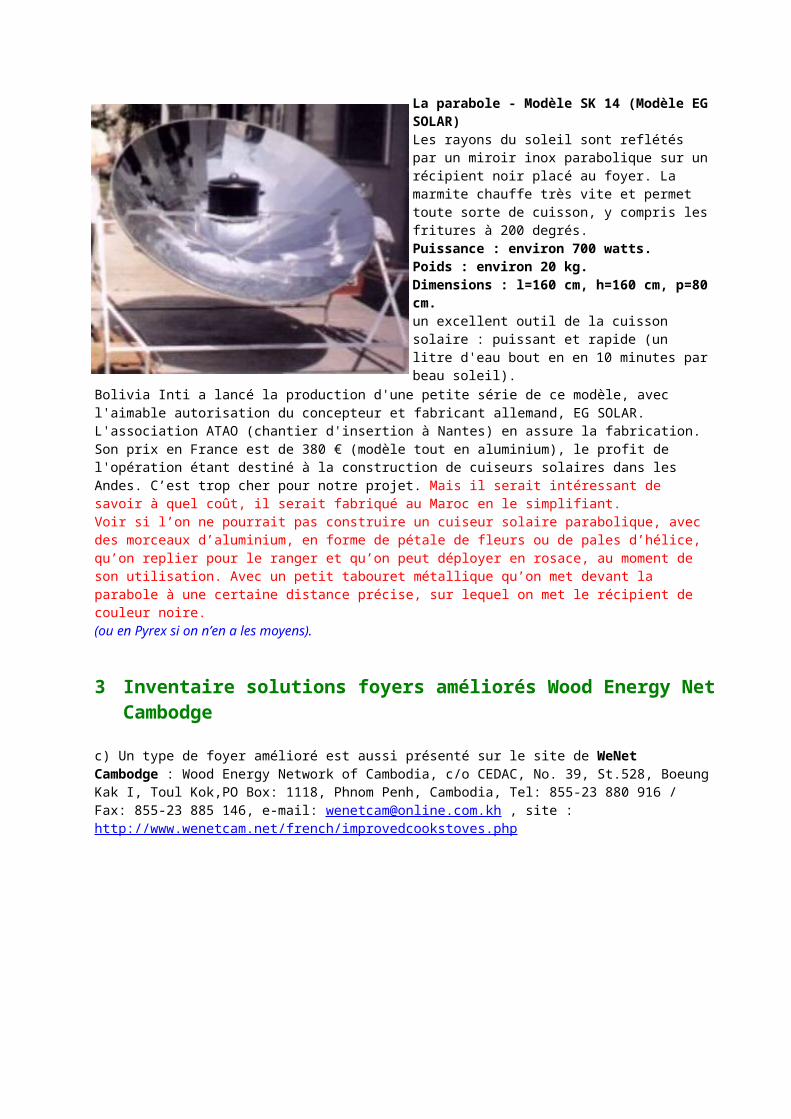
La parabole - Modèle SK 14 (Modèle EG SOLAR)Les rayons du soleil sont reflétés par un miroir inox parabolique sur un récipient noir placé au foyer. La marmite chauffe très vite et permet toute sorte de cuisson, y compris les fritures à 200 degrés.Puissance : environ 700 watts.Poids : environ 20 kg.Dimensions : l=160 cm, h=160 cm, p=80 cm.un excellent outil de la cuisson solaire : puissant et rapide (un litre d'eau bout en en 10 minutes par beau soleil).
Bolivia Inti a lancé la production d'une petite série de ce modèle, avec l'aimable autorisation du concepteur et fabricant allemand, EG SOLAR. L'association ATAO (chantier d'insertion à Nantes) en assure la fabrication. Son prix en France est de 380 € (modèle tout en aluminium), le profit de l'opération étant destiné à la construction de cuiseurs solaires dans les Andes. C’est trop cher pour notre projet. Mais il serait intéressant de savoir à quel coût, il serait fabriqué au Maroc en le simplifiant.Voir si l’on ne pourrait pas construire un cuiseur solaire parabolique, avec des morceaux d’aluminium, en forme de pétale de fleurs ou de pales d’hélice, qu’on replier pour le ranger et qu’on peut déployer en rosace, au moment de son utilisation. Avec un petit tabouret métallique qu’on met devant la parabole à une certaine distance précise, sur lequel on met le récipient de couleur noire.(ou en Pyrex si on n’en a les moyens).
3 Inventaire solutions foyers améliorés Wood Energy Net Cambodge
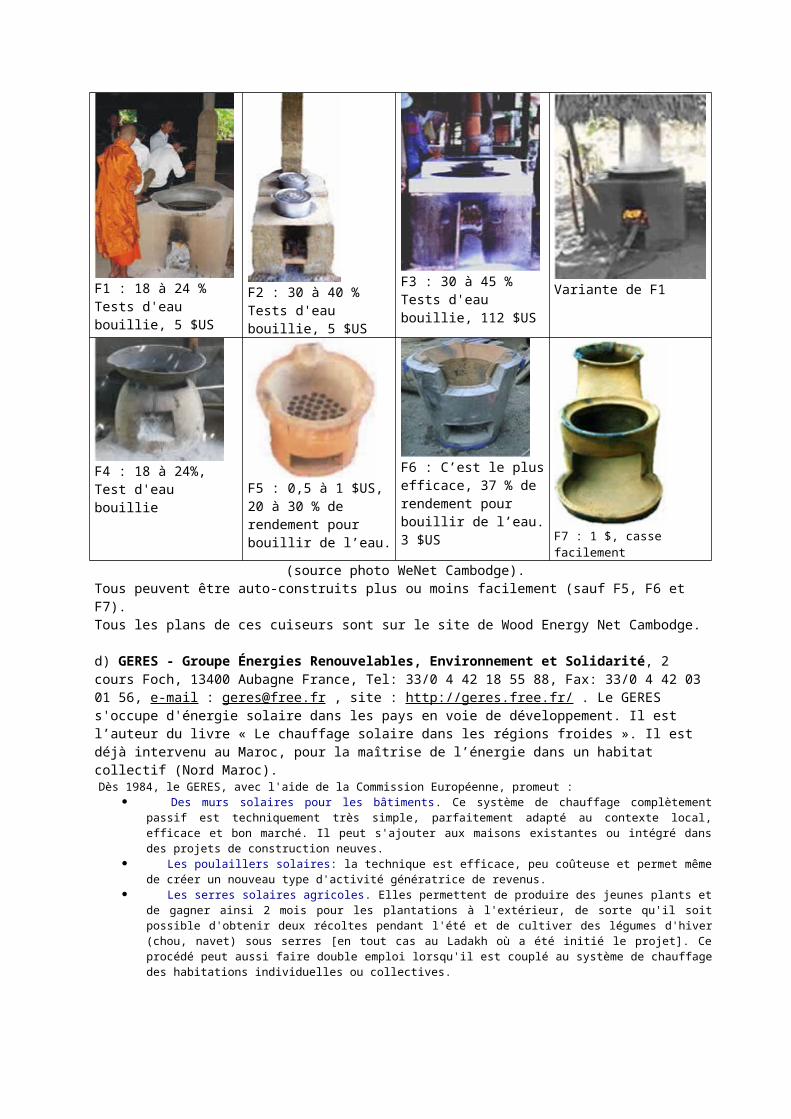
c) Un type de foyer amélioré est aussi présenté sur le site de WeNet Cambodge : Wood Energy Network of Cambodia, c/o CEDAC, No. 39, St.528, Boeung Kak I, Toul Kok,PO Box: 1118, Phnom Penh, Cambodia, Tel: 855-23 880 916 / Fax: 855-23 885 146, e-mail: [email protected] , site : http://www.wenetcam.net/french/improvedcookstoves.php
F1 : 18 à 24 % Tests d'eau bouillie, 5 $US
F2 : 30 à 40 % Tests d'eau bouillie, 5 $US
F3 : 30 à 45 % Tests d'eau bouillie, 112 $US
Variante de F1
F4 : 18 à 24%, Test d'eau bouillie F5 : 0,5 à 1 $US, 20 à
30 % de rendement pour bouillir de l’eau.
F6 : C’est le plus efficace, 37 % de rendement pour bouillir de l’eau.3 $US F7 : 1 $, casse
facilement(source photo WeNet Cambodge).
Tous peuvent être auto-construits plus ou moins facilement (sauf F5, F6 et F7).Tous les plans de ces cuiseurs sont sur le site de Wood Energy Net Cambodge. d) GERES - Groupe Énergies Renouvelables, Environnement et Solidarité, 2 cours Foch, 13400 Aubagne France, Tel: 33/0 4 42 18 55 88, Fax: 33/0 4 42 03 01 56, e-mail : [email protected] , site : http://geres.free.fr/ . Le GERES s'occupe d'énergie solaire dans les pays en voie de développement. Il est l’auteur du livre « Le chauffage solaire dans les régions froides ». Il est déjà intervenu au Maroc, pour la maîtrise de l’énergie dans un habitat collectif (Nord Maroc).Dès 1984, le GERES, avec l'aide de la Commission Européenne, promeut :
Des murs solaires pour les bâtiments. Ce système de chauffage complètement passif est techniquement très simple, parfaitement adapté au contexte local, efficace et bon marché. Il peut s'ajouter aux maisons existantes ou intégré dans des projets de construction neuves.
Les poulaillers solaires: la technique est efficace, peu coûteuse et permet même de créer un nouveau type d'activité génératrice de revenus.
Les serres solaires agricoles. Elles permettent de produire des jeunes plants et de gagner ainsi 2 mois pour les plantations à l'extérieur, de sorte qu'il soit possible d'obtenir deux récoltes pendant l'été et de cultiver des légumes d'hiver (chou, navet) sous serres [en tout cas au Ladakh où a été initié le projet]. Ce procédé peut aussi faire double emploi lorsqu'il est couplé au système de chauffage des habitations individuelles ou collectives.
(e) EDIF - Énergies Durables en Île-de-France, Espace Info Énergie 10ème /18ème /19ème arrondissement de Paris, 17 rue curial 75019 Paris, tél. : 01 42 09 66 75, http://groups.msn.com/edif/edif.msnw , e-mail : [email protected] ). EDIF a pour but de promouvoir la maîtrise de l'énergie et les énergies renouvelables, en Ile de France (en liaison avec le Comité de Liaison des Energies Renouvelables (CLER)).(pour mention).
4 Cuiseur solaire Raymond Léger
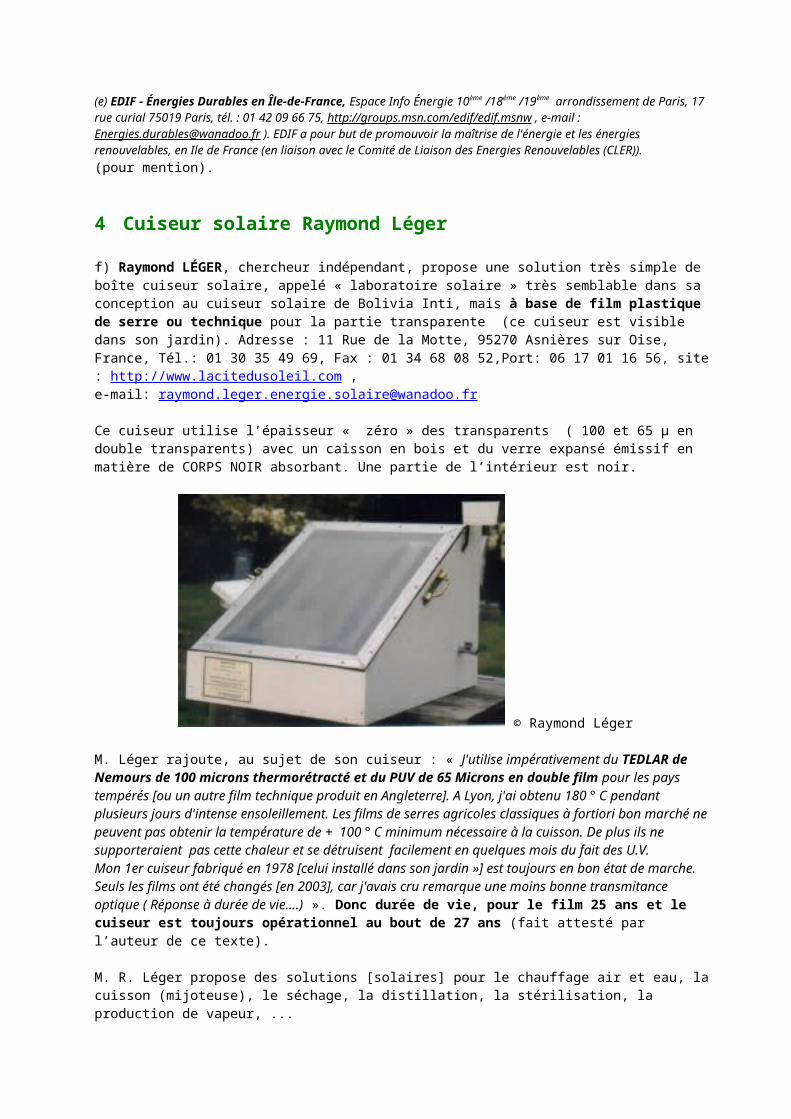
f) Raymond LÉGER, chercheur indépendant, propose une solution très simple de boîte cuiseur solaire, appelé « laboratoire solaire » très semblable dans sa conception au cuiseur solaire de Bolivia Inti, mais à base de film plastique de serre ou technique pour la partie transparente (ce cuiseur est visible dans son jardin). Adresse : 11 Rue de la Motte, 95270 Asnières sur Oise, France, Tél.: 01 30 35 49 69, Fax : 01 34 68 08 52,Port: 06 17 01 16 56, site : http://www.lacitedusoleil.com , e-mail: [email protected] Ce cuiseur utilise l’épaisseur « zéro » des transparents ( 100 et 65 µ en double transparents) avec un caisson en bois et du verre expansé émissif en matière de CORPS NOIR absorbant. Une partie de l’intérieur est noir.
© Raymond Léger
M. Léger rajoute, au sujet de son cuiseur : « J'utilise impérativement du TEDLAR de Nemours de 100 microns thermorétracté et du PUV de 65 Microns en double film pour les pays tempérés [ou un autre film technique produit en Angleterre]. A Lyon, j'ai obtenu 180 ° C pendant plusieurs jours d'intense ensoleillement. Les films de serres agricoles classiques à fortiori bon marché ne peuvent pas obtenir la température de + 100 ° C minimum nécessaire à la cuisson. De plus ils ne supporteraient pas cette chaleur et se détruisent facilement en quelques mois du fait des U.V.Mon 1er cuiseur fabriqué en 1978 [celui installé dans son jardin »] est toujours en bon état de marche. Seuls les films ont été changés [en 2003], car j'avais cru remarque une moins bonne transmitance optique ( Réponse à durée de vie....) ». Donc durée de vie, pour le film 25 ans et le cuiseur est toujours opérationnel au bout de 27 ans (fait attesté par l’auteur de ce texte).
M. R. Léger propose des solutions [solaires] pour le chauffage air et eau, la cuisson (mijoteuse), le séchage, la distillation, la stérilisation, la production de vapeur, ...
Les avantages de ce cuiseur : Dupont de Nemour livre sous rouleau de 700 m, son TEDLAR, un film très fin et très léger (utilisé en aéronautique légère / ULM), qui peut couvrir des surfaces énormes.Les inconvénients : ces films techniques ne se trouvent pas au Maroc. Peut-être pourraient-on obtenir d’un fabricant de ces films techniques un don humanitaire (?), un rouleau ? Mais reste son franchissement au niveau la douane marocaine (est-il facile ?).
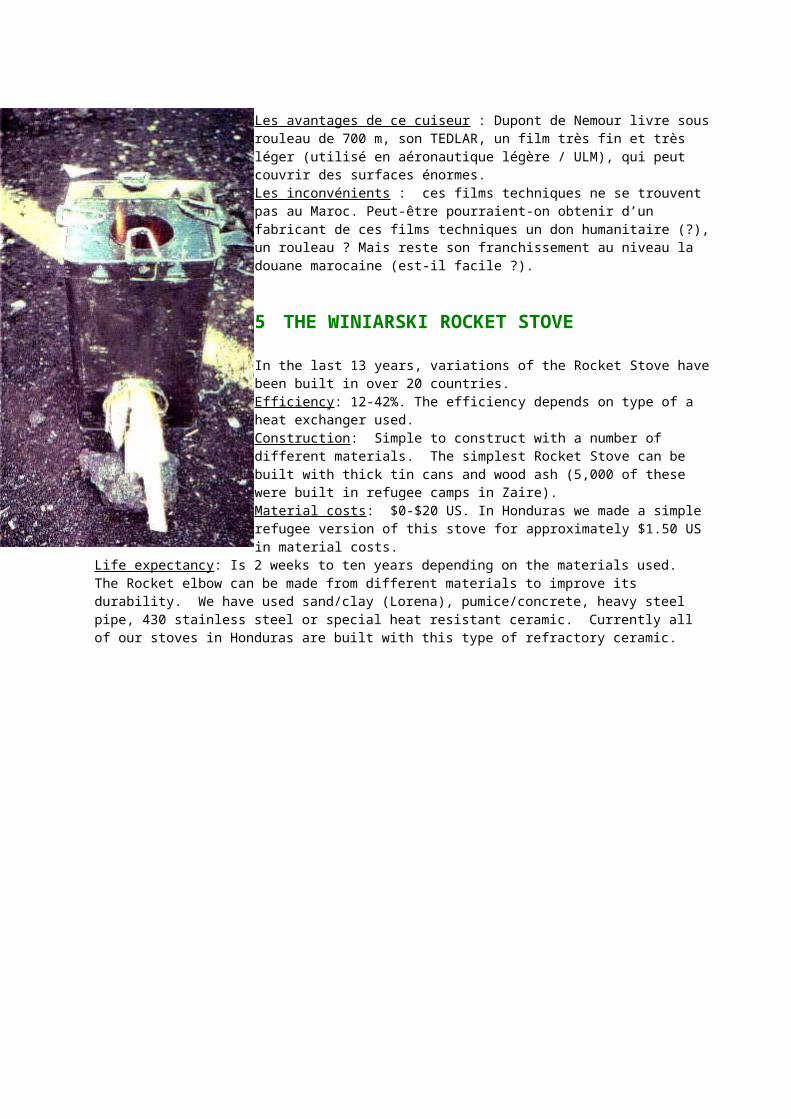
5 THE WINIARSKI ROCKET STOVE
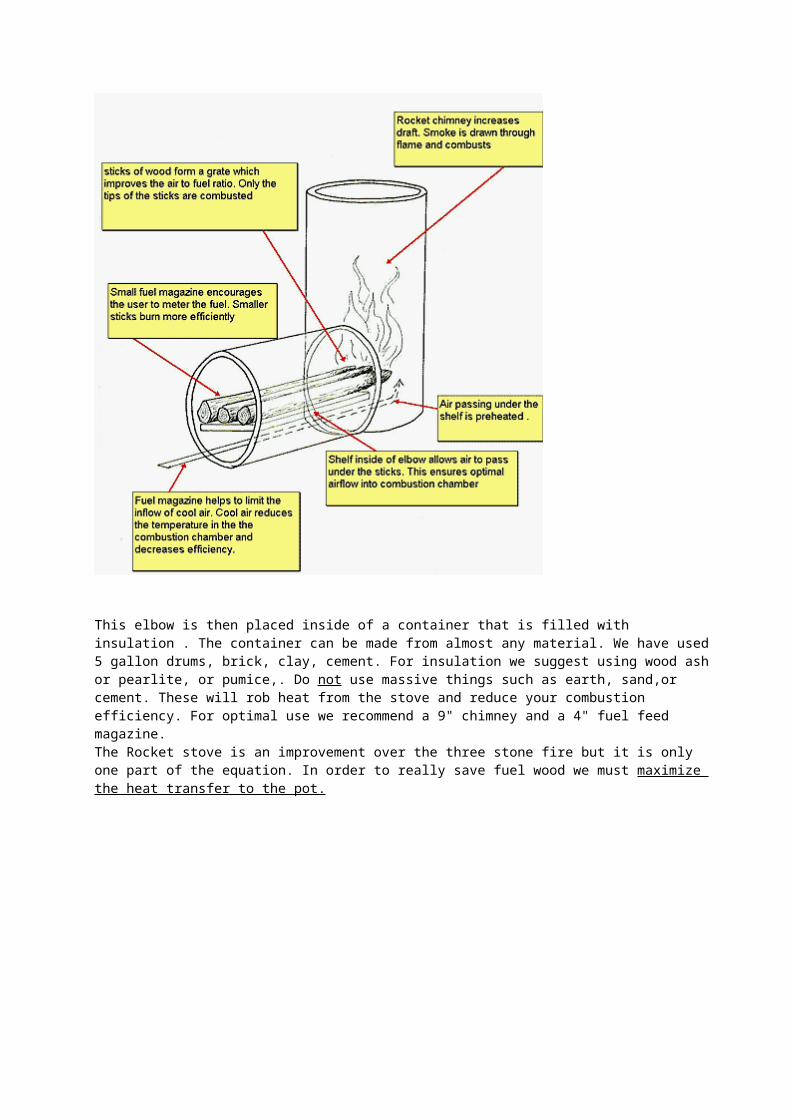
In the last 13 years, variations of the Rocket Stove have been built in over 20 countries.Efficiency: 12-42%. The efficiency depends on type of a heat exchanger used.Construction: Simple to construct with a number of different materials. The simplest Rocket Stove can be built with thick tin cans and wood ash (5,000 of these were built in refugee camps in Zaire).Material costs: $0-$20 US. In Honduras we made a simple refugee version of this stove for approximately $1.50 US in material costs.Life expectancy: Is 2 weeks to ten years depending on the materials used.The Rocket elbow can be made from different materials to improve its durability. We have used sand/clay (Lorena), pumice/concrete, heavy steel pipe, 430 stainless steel or special heat resistant ceramic. Currently all of our stoves in Honduras are built with this type of refractory ceramic.
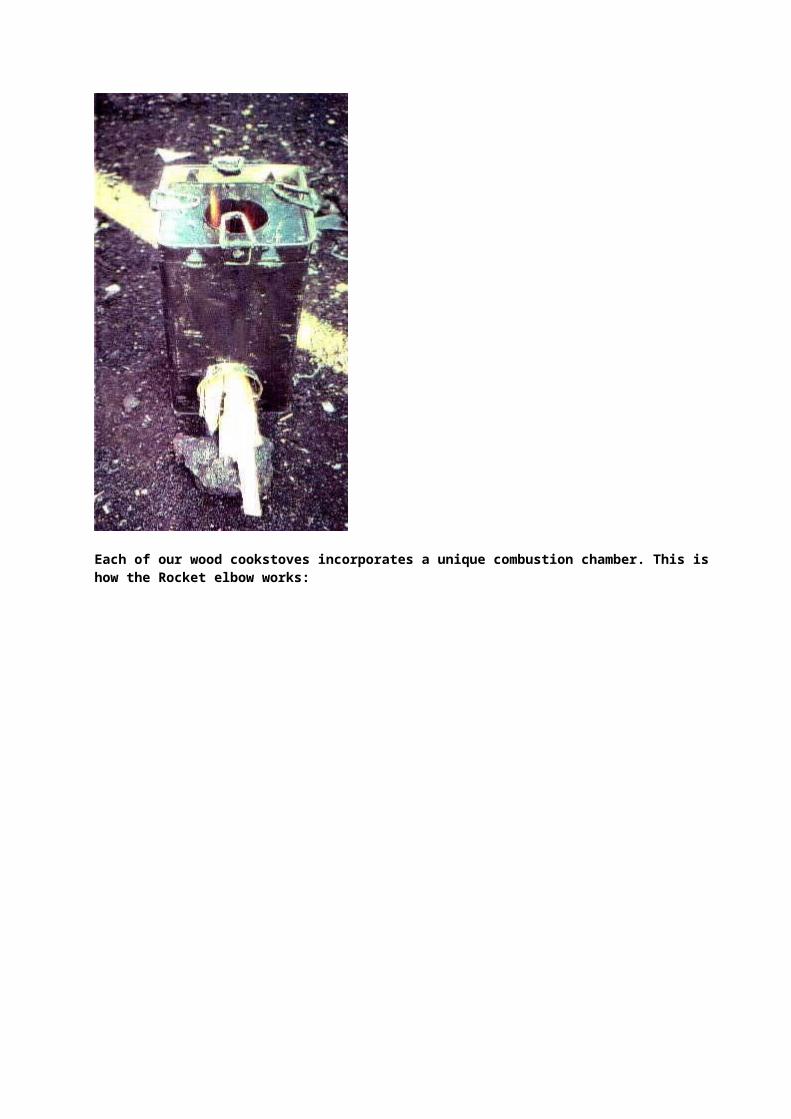
Each of our wood cookstoves incorporates a unique combustion chamber. This is how the Rocket elbow works:
This elbow is then placed inside of a container that is filled with insulation . The container can be made from almost any material. We have used 5 gallon drums, brick, clay, cement. For insulation we suggest using wood ash or pearlite, or pumice,. Do not use massive things such as earth, sand,or cement. These will rob heat from the stove and reduce your combustion efficiency. For optimal use we recommend a 9" chimney and a 4" fuel feed magazine. The Rocket stove is an improvement over the three stone fire but it is only one part of the equation. In order to really save fuel wood we must maximize the heat transfer to the pot.
This picture shows a thin piece of metal (a skirt) wrapped around the pot. This skirt forces the hot flue gases to rub against the bottom and the sides of the pots. The gap between the pot and the skirt should be about 1cm (assuming you are using an average-sized pot). In our tests, this simple heat exchanger (an old coffee can works well!) almost doubles the efficiency of the rocket stove.
source : http://www.efn.org/~apro/AT/atrocketpage.html
6 Cuiseur semi-cylindrique (Ferme du Collet)
Au moyen d’une simple plaque de bois aggloméré, d’une tôle en inox, d’une dizaine de clous, et d’une boite en verre (un aquarium ou un grand plat de verre) contenant le plat, on réalise un cuiseur solaire.
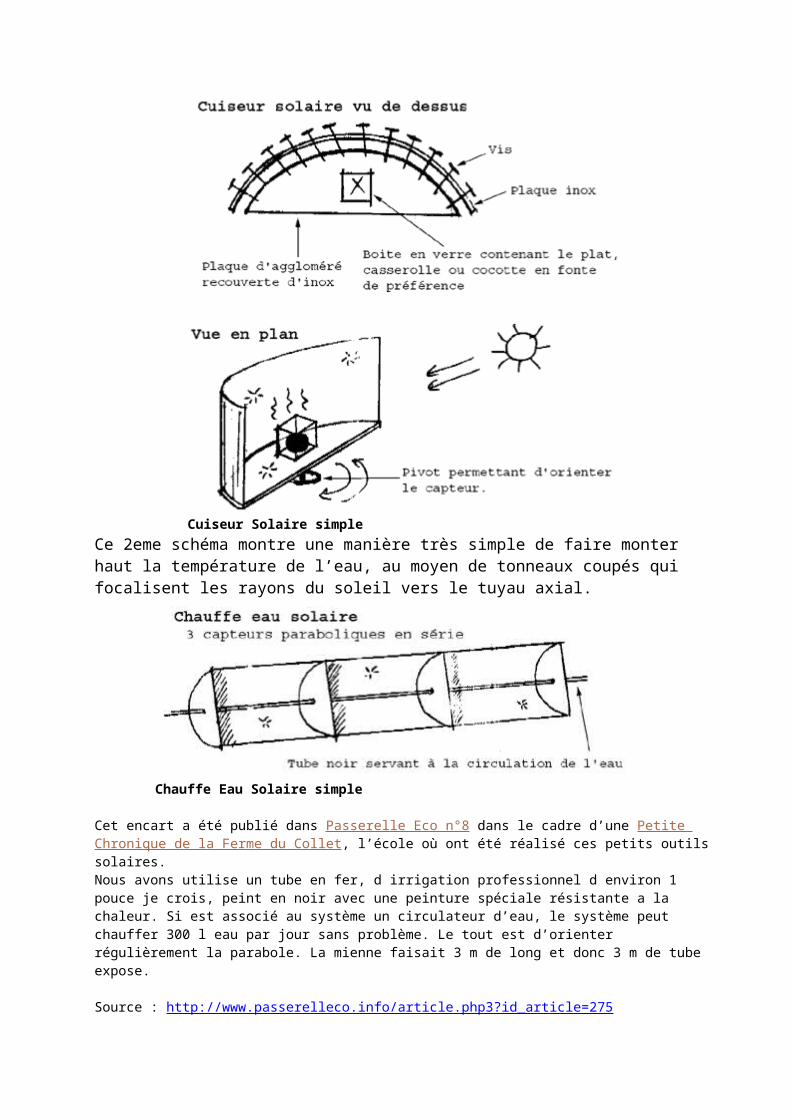
Cuiseur Solaire simpleCe 2eme schéma montre une manière très simple de faire monter haut la température de l’eau, au moyen de tonneaux coupés qui focalisent les rayons du soleil vers le tuyau axial.
Chauffe Eau Solaire simple
Cet encart a été publié dans Passerelle Eco n°8 dans le cadre d’une Petite Chronique de la Ferme du Collet, l’école où ont été réalisé ces petits outils solaires.Nous avons utilise un tube en fer, d irrigation professionnel d environ 1 pouce je crois, peint en noir avec une peinture spéciale résistante a la chaleur. Si est associé au système un circulateur d’eau, le système peut chauffer 300 l eau par jour sans problème. Le tout est d’orienter régulièrement la parabole. La mienne faisait 3 m de long et donc 3 m de tube expose.
Source : http://www.passerelleco.info/article.php3?id_article=275
7 Le "Cookit" Cuiseur Solaire Familial Pliant
Tous les cuiseurs suivants sont sur le site :
http://solarcooking.org/plans.htm#panel-style

Le Cuiseur Solaire Familial Pliant n'est ni un "four solaire" ni un "réflecteur parabolique" mais un astucieux mélange. Son extrême simplicité cache une grande puissance de cuisson. Son faible coût met la cuisson solaire à la portée d'un plus grand nombre d'utilisateurs.Il permet de cuire les aliments, le pain, pasteuriser l'eau et apprendre les bases de l'énergie solaire.
Ses inventeurs sont Roger Bernard en France et Barbara Kerr aux USA, avec la contribution de Edwin Pejack, Jay Campbell, et Bev Blum de Solar Cookers International. Des essais de terrain approfondis aux USA et avec des refugiés au Kenya ont confirmé ses performances, sa facilité d'utilisation, son faible coût, son acceptation, et son adaptabilité aux besoins divers.
Construction
Commencer par découper et plier un grand morceau de carton d'environ 1m x 1.33m (3'x 4')comme indiqué. Les angles et plis indiqués sont les meilleurs, mais de faibles écarts sont sans importance.Conseil : Pour faire des plis droits dans du carton, commencer par faire une marque le long du trait avec un objet non tranchant comme un manche de cuiller puis plier en s'appuyant sur un angle rectiligne.
Découper les fentes (slot) légèrement trop étroites afin qu'elles retiennent le panneau avant.Coller du papier d'aluminium sur la face qui se trouvera à l'intérieur lorsque le cuiseur sera monté.Pour le montage, étaler le panneau, côté brillant au dessus. Replier les parties avant et arrière et engager les coins dans les fentes de l'avant.
Vous êtes prêt à cuisiner! Placer la nourriture dans un pot de couleur sombre. Mettre ensuite le pot dans un sac en plastique (un sac pour la cuisson au four résistera mieux à la chaleur). Fermer le sac et placer le pot et le sac au centre du cuiseur. Vous pouvez commander un Cookit préfabriqué ici.
Trucs et Astuces
Dr. Steven Jones a découvert que soulever le pot avec un support en fil de fer améliore la cuisson.
Wietske Jongbloed a créé un support simple pour éviter d'endommager le sac plastique.
CooKitThe CooKit is a lightweight, panel-style solar cooker. Convenient for home, camping and emergencies, it folds flat to 13"x13"x2". Made of cardboard and foil. Reaches temperatures in the mid-
200ºFs. Comes with two high-temperature cooking bags, required for cooking. Use with a black, covered pot (not included).CKT $25.00
Source : http://solarcookers.org/order/cookers.html
8 Le Cuiseur Solaire à Panneaux Bernard
Un modèle simple, portable qui pourrait ouvrir de nouveaux horizons
Il est généralement admis qu'un cuiseur solaire doit avoir une capacité minimale pour pouvoir fonctionner correctement. Par
exemple, dans le livret Your own Solar Box, Solar Cookers International (SCI) recommande un caisson aux dimensions intérieures d'au moins 45 cm X 55 cm. Cela donne un caisson relativement grand, bien adapté pour un usage familial, mais
qui peut se révéler inutilement encombrant dans certains cas.
De plus petits cuiseurs seront appréciés dans les cas suivants :
personnes vivant ou voyageant seules, personnes vivant en famille, mais avec un régime spécial, personnes âgées ayant des difficultés à déplacer un boîtier lourd, adolescents souhaitant construire et expérimenter leur premier cuiseur
Si vous appartenez à l'une de ces catégories, voici comment construire un petit cuiseur bon marché et très efficace.
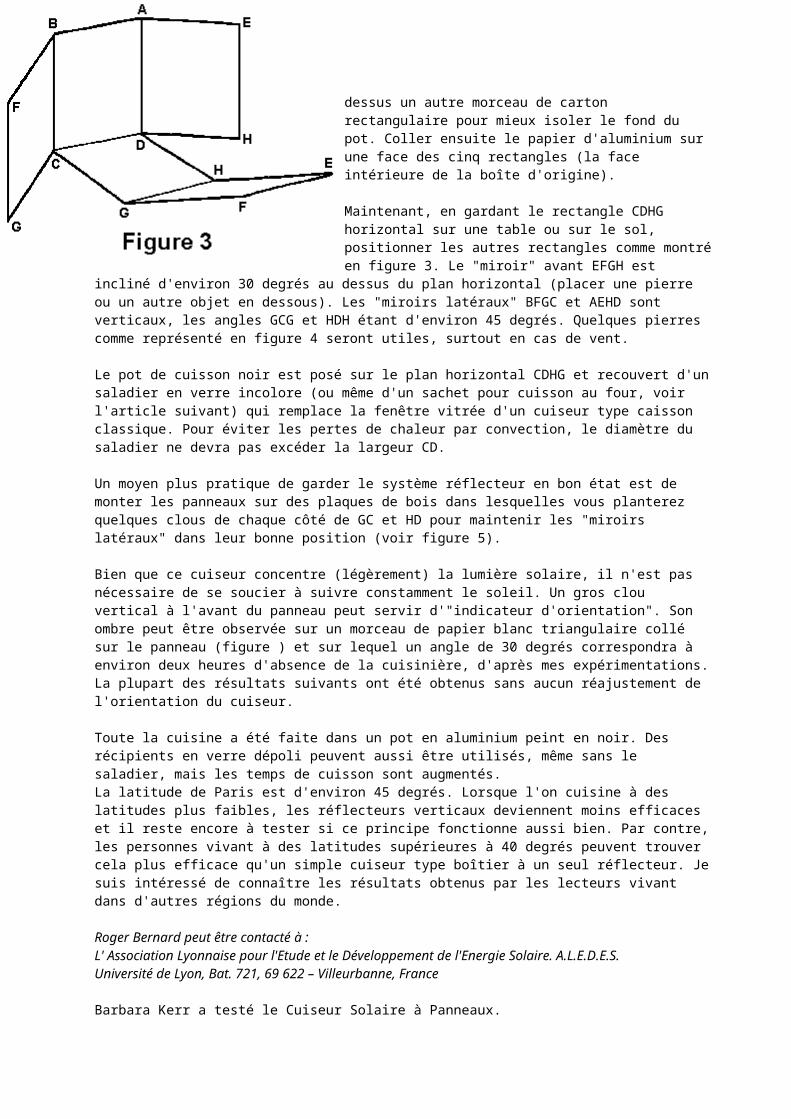
Choisir une boîte en carton (figure 1) avec une hauteur BC plus grande que la largeur DC. Par exemple, pour mon propre cuiseur, BC=30cm, DC=23cm et CG=25cm.
Retirer les rabats de la boîte. Puis découper le long des plis FG et GC. Faire de même de l'autre côté le long de EH et HD. Le carton s'étale en un ensemble plat de cinq rectangles comme sur la figure 2 (les lettres qui apparaissent deux fois sur ce dessin indiquent deux points qui étaient le même point avant le découpage). Si le carton est mince, renforcer le rectangle CDHG en collant dessus un autre morceau de carton rectangulaire pour mieux isoler le fond du pot. Coller ensuite le papier d'aluminium sur une face des cinq rectangles (la face intérieure de la boîte d'origine).
Maintenant, en gardant le rectangle CDHG horizontal sur une table ou sur le sol, positionner les autres rectangles comme montré en figure 3. Le "miroir" avant EFGH est incliné d'environ 30 degrés au dessus du plan horizontal (placer une pierre ou un autre objet en dessous). Les "miroirs latéraux" BFGC et AEHD sont verticaux, les angles GCG et HDH étant d'environ 45 degrés. Quelques pierres comme représenté en figure 4 seront utiles, surtout en cas de vent.
Le pot de cuisson noir est posé sur le plan horizontal CDHG et recouvert d'un saladier en verre incolore (ou même d'un sachet pour cuisson au four, voir l'article suivant) qui remplace la fenêtre vitrée d'un
cuiseur type caisson classique. Pour éviter les pertes de chaleur par convection, le diamètre du saladier ne devra pas excéder la largeur CD.
Un moyen plus pratique de garder le système réflecteur en bon état est de monter les panneaux sur des plaques de bois dans lesquelles vous planterez quelques clous de chaque côté de GC et HD pour maintenir les "miroirs latéraux" dans leur bonne position (voir figure 5).
Bien que ce cuiseur concentre (légèrement) la lumière solaire, il n'est pas nécessaire de se soucier à suivre constamment le soleil. Un gros clou vertical à l'avant du panneau peut servir d'"indicateur d'orientation". Son ombre peut être observée sur un morceau de papier blanc triangulaire collé sur le panneau (figure ) et sur lequel un angle de 30 degrés correspondra à environ deux heures d'absence de la cuisinière, d'après mes expérimentations. La plupart des résultats suivants ont été obtenus sans aucun réajustement de l'orientation du cuiseur.
Toute la cuisine a été faite dans un pot en aluminium peint en noir. Des récipients en verre dépoli peuvent aussi être utilisés, même sans le saladier, mais les temps de cuisson sont augmentés.La latitude de Paris est d'environ 45 degrés. Lorsque l'on cuisine à des latitudes plus faibles, les réflecteurs verticaux deviennent moins efficaces et il reste encore à tester si ce principe fonctionne aussi bien. Par contre, les personnes vivant à des latitudes supérieures à 40 degrés peuvent trouver cela plus efficace qu'un simple cuiseur type boîtier à un seul réflecteur. Je suis intéressé de connaître les résultats obtenus par les lecteurs vivant dans d'autres régions du monde.
Roger Bernard peut être contacté à :L' Association Lyonnaise pour l'Etude et le Développement de l'Energie Solaire. A.L.E.D.E.S. Université de Lyon, Bat. 721, 69 622 – Villeurbanne, France
Barbara Kerr a testé le Cuiseur Solaire à Panneaux.
Je suis vraiment enthousiasmée par les opportunités offertes par le principe de cuiseurs solaires de Roger Bernard. Nous savions que des réflecteurs multiples pouvaient servir à concentrer le rayonnement solaire, mais je ne les ai jamais considérés comme des cuiseurs sérieux avant d’avoir vu mon ragoût de lentilles mijoter sous le saladier en verre. J’ai soudain pensé que l’on pouvait utiliser des sachets pour la cuisson au four à la place du saladier. Cela constituerait une " boîte solaire " simplifiée. Tout ce que nous avons appris au fil des années avec les cuiseurs de type caisson peut être utile pour l’utilisation des cuiseurs à panneaux (SPC). Maintenant, nous disposons à la fois de notre " four " et de notre " plaque de cuisson ".
En nous limitant à des panneaux réfléchissants plats, le danger pour les yeux est fortement réduit mais reste un problème. Les affections de la rétine qui peuvent se produire lorsque la lumière du soleil pénètre dans les yeux ne sont pas douloureuses. Il n’est pas possible de s’en rendre compte, mais une brûlure de la rétine laisse des dommages irréversibles et peut rendre aveugle. Soyez extrêmement prudent si vous utilisez quoi que ce soit qui concentre la lumières du soleil ou reflète le soleil directement dans vos yeux.
Le premier cuiseur que j’ai fabriqué suivant les spécifications de Roger Bernard ne pouvait pas se plier correctement. Les illustrations montrent une légère modification du principe de Roger. Les panneaux étant tous de la même taille, ils se plient pour former un paquet plat qui est si petit et léger qu’il peut être transporté dans un sac à dos, par exemple. Des surfaces supplémentaires permettent de placer des pierres pour retenir les panneaux sans créer d’ombre. Les vents sont violents et imprévisibles ! J’ai constaté qu’un cuiseur à panneaux en carton installé de cette manière résiste très bien au vent.
Placez le pot dans un sachet pour cuisson au four avec l’ouverture au dessus afin de pouvoir ouvrir le sachet pour contrôler la nourriture et le refermer sans perturber la cuisson. Cette partie du sac est généralement sèche, ce qui est important parce qu’il est souvent nécessaire de surveiller et de remuer la nourriture dans un cuiseur à panneaux puisque la chaleur n’est pas assez homogène.
Au début, j’ai fermé les sachets de cuisson avec une pince à linge qui était trop lourde. Ensuite, j’ai utilisé un trombone, mais cela perçait le sachet qui aurait pu servir plusieurs fois autrement. Un fil de fer fin convenait bien mais se cassait après avoir été torsadé plusieurs fois. Maintenant, j’utilise du fil de fer, mais simplement enroulé serré autour du col du sachet, sans le torsader. Puisqu’il n’y a pas de pression, cela marche bien et l’attache dure longtemps.
Trop souvent, j'ai vu des récipients qui avaient sérieusement débordé en répandant du bouillon, faisant un désastre. J'ai dû veiller à laisser plus d'espace au dessus pour contenir l'ébullition, au moins jusqu'à ce que j'apprenne à quel moment cela va arriver. Un problème délicat. La nourriture n'a pas un parfum aussi délicat que celle préparée avec un cuiseur de type caisson, probablement à cause des températures plus élevées.
Ensuite, j'ai remarqué un point froid sur le réflecteur situé directement sous le pot et je me suis souvenue que les ingénieurs de l'université de Washington avaient trouvé un avantage à élever le plateau par rapport au réflecteur de fond sur les cuiseurs à panneaux. J'ai recherché dans la cuisine un "élévateur" et je suis tombée sur des joints de conserve. Il est clair que les pots chauffent plus vite lorsqu'ils sont surélevés que lorsqu'ils sont posés
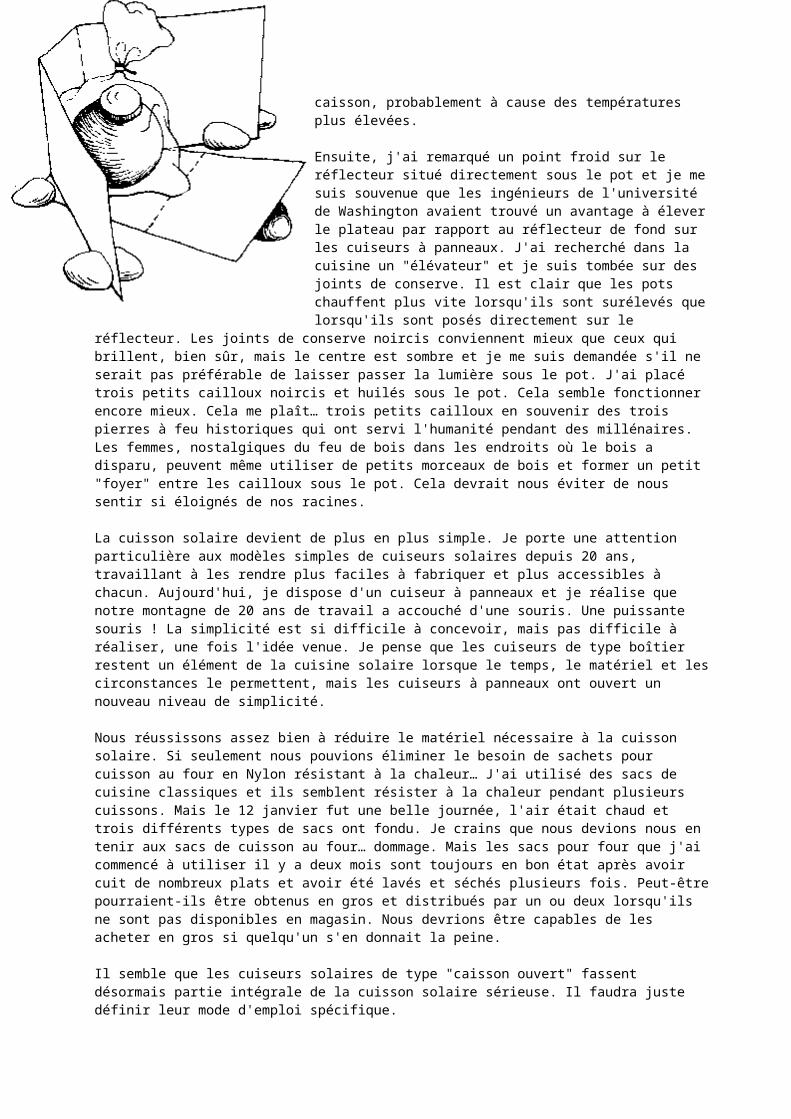
directement sur le réflecteur. Les joints de conserve noircis conviennent mieux que ceux qui brillent, bien sûr, mais le centre est sombre et je me suis demandée s'il ne serait pas préférable de laisser passer la lumière sous le pot. J'ai placé trois petits cailloux noircis et huilés sous le pot. Cela semble fonctionner encore mieux. Cela me plaît… trois petits cailloux en souvenir des trois pierres à feu historiques qui ont servi l'humanité pendant des millénaires. Les femmes, nostalgiques du feu de bois dans les endroits où le bois a disparu, peuvent même utiliser de petits morceaux de bois et former un petit "foyer" entre les cailloux sous le pot. Cela devrait nous éviter de nous sentir si éloignés de nos racines.
La cuisson solaire devient de plus en plus simple. Je porte une attention particulière aux modèles simples de cuiseurs solaires depuis 20 ans, travaillant à les rendre plus faciles à fabriquer et plus accessibles à chacun. Aujourd'hui, je dispose d'un cuiseur à panneaux et je réalise que notre montagne de 20 ans de travail a accouché d'une souris. Une puissante souris ! La simplicité est si difficile à concevoir, mais pas difficile à réaliser, une fois l'idée venue. Je pense que les cuiseurs de type boîtier restent un élément de la cuisine solaire lorsque le temps, le matériel et les circonstances le permettent, mais les cuiseurs à panneaux ont ouvert un nouveau niveau de simplicité.
Nous réussissons assez bien à réduire le matériel nécessaire à la cuisson solaire. Si seulement nous pouvions éliminer le besoin de sachets pour cuisson au four en Nylon résistant à la chaleur… J'ai utilisé des sacs de cuisine classiques et ils semblent résister à la chaleur pendant plusieurs cuissons. Mais le 12 janvier fut une belle journée, l'air était chaud et trois différents types de sacs ont fondu. Je crains que nous devions nous en tenir aux sacs de cuisson au four… dommage. Mais les sacs pour four que j'ai commencé à utiliser il y a deux mois sont toujours en bon état après avoir cuit de nombreux plats et avoir été lavés et séchés plusieurs fois. Peut-être pourraient-ils être obtenus en gros et distribués par un ou deux lorsqu'ils ne sont pas disponibles en magasin. Nous devrions être capables de les acheter en gros si quelqu'un s'en donnait la peine.
Il semble que les cuiseurs solaires de type "caisson ouvert" fassent désormais partie intégrale de la cuisson solaire sérieuse. Il faudra juste définir leur mode d'emploi spécifique.Merci de me faire part, ainsi qu'à Roger Bernard, de vos trouvailles et commentaires. Nous les diffuserons dans notre revue "Solar Box Journal".
Barbara Kerr, P.O. Box 576, Taylor, Arizona 85939 USA
9 The Solar Funnel Cooker
How to Make and Use The BYU Solar Cooker/Cooler
by Steven E. Jones, Professor of Physics at Brigham Young University (BYU), with Colter Paulson, Jason Chesley, Jacob Fugal, Derek Hullinger, Jamie Winterton, Jeannette Lawler, and Seth, David, Nathan, and Danelle Jones.
Introduction
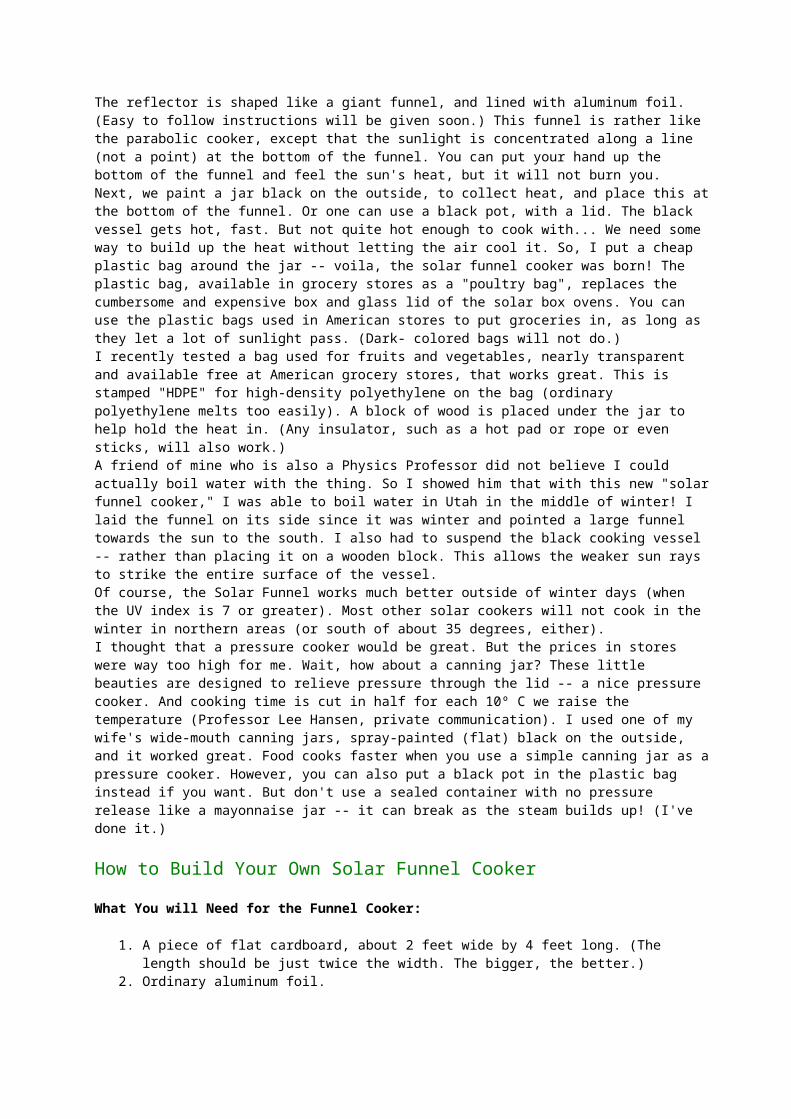
A few years ago, I woke up to the fact that half of the world's peoples must burn wood or dried dung in order to cook their food. It came as quite a shock to me, especially as I learned of the illnesses caused by breathing smoke day in and day out, and the environmental impacts of deforestation -not to mention the time spent by people (mostly women) gathering sticks and dung to cook their food. And yet, many of these billions of people live near the equator, where sunshine is abundant and free. Ergo...As a University Professor of Physics with a background in energy usage, I set out to develop a means of cooking food and sterilizing water using the free energy of the sun. First, I looked at existing methods.
The parabolic cooker involves a reflective dish that concentrates sunlight to a point where the food is cooked. This approach is very dangerous since the sun's energy is focused to a point which is very hot, but which cannot be seen. (BYU students and I built one which will set paper on fire in about 3 seconds!) I learned that an altruistic group had offered reflecting parabolas to the people living at the Altiplano in Bolivia. But more than once the parabolas had been stored next to a shed -- and the passing sun set the sheds on fire! The people did not want these dangerous, expensive devices, even though the Altiplano region has been stripped of fuel wood.The box cooker: Basically an insulated box with a glass or plastic lid, often with a reflecting lid to reflect sunlight into the box. Light enters through the top glass (or plastic), to slowly heat up the box. Problems:
energy enters only through the top, while heat is escaping through all the other sides, which have a tendency to draw heat away from the food. When the box is opened to put food in or take it out, some of the heat escapes and is lost. Also, effective box cookers tend to be more complicated to build than the funnel cooker.While studying this problem, I thought again and again of the great need for a safe, inexpensive yet effective solar cooker. It finally came to me at Christmastime a few years ago, a sort of hybrid between the parabola and a box cooker. It looks like a large, deep funnel, and incorporates what I believe are the best features of the parabolic cooker and the box cooker. The first reflector was made at my home out of aluminum foil glued onto cardboard, then this was curved to form a reflective funnel. My children and I figured out a way to make a large card-board funnel easily. (I'll tell you exactly how to do this later on.)The Solar Funnel Cooker is safe and low cost, easy to make, yet very effective in capturing the sun's energy for cooking and pasteurizing water -> Eureka!Later, I did extensive tests with students (including reflectivity tests) and found that aluminized Mylar was good too, but relatively expensive and rather hard to come by in large sheets. Besides, cardboard is found throughout the world and is inexpensive, and aluminum foil is also easy to come by. And individuals can make their own solar cookers easily, or start a cottage-industry to manufacture them for others.Prototypes of the Solar Funnel Cooker were tested in Bolivia, and outperformed an expensive solar box cooker and a "Solar Cookit" - while costing much less. Brigham Young University submitted a patent application, mainly to insure that no company would prevent wide distribution of the Solar Funnel Cooker. BYU makes no profit from the invention. ( I later learned that a few people had had a similar idea, but with methods differing from those developed and shown here.) So now I'm trying to get the word out so that the invention can be used to capture the free energy of the sun - for camping and for emergencies, yes, but also for every day cooking where electricity is not available and even fuel wood is getting scarce.
How it Works
The reflector is shaped like a giant funnel, and lined with aluminum foil. (Easy to follow instructions will be given soon.) This funnel is rather like the parabolic cooker, except that the sunlight is concentrated along a line (not a point) at the bottom of the funnel. You can put your hand up the bottom of the funnel and feel the sun's heat, but it will not burn you.Next, we paint a jar black on the outside, to collect heat, and place this at the bottom of the funnel. Or one can use a black pot, with a lid. The black vessel gets hot, fast. But not quite hot enough to cook with... We need some way to build up the heat without letting the air cool it. So, I put a cheap plastic bag around the jar -- voila, the solar funnel cooker was born! The plastic bag, available in grocery stores as a "poultry bag", replaces the cumbersome and expensive box and glass lid of the solar box ovens. You can use the plastic bags used in American stores to put groceries in, as long as they let a lot of sunlight pass. (Dark- colored bags will not do.)I recently tested a bag used for fruits and vegetables, nearly transparent and available free at American grocery stores, that works great. This is stamped "HDPE" for high-density polyethylene on the bag (ordinary polyethylene melts too easily). A block of wood is placed under the jar to help hold the heat in. (Any insulator, such as a hot pad or rope or even sticks, will also work.)A friend of mine who is also a Physics Professor did not believe I could actually boil water with the thing. So I showed him that with this new "solar funnel cooker," I was able to boil water in Utah in the middle of winter! I laid the funnel on its side since it was winter and pointed a large funnel towards the sun to the south. I also had to suspend the black cooking vessel -- rather than placing it on a wooden block. This allows the weaker sun rays to strike the entire surface of the vessel.Of course, the Solar Funnel works much better outside of winter days (when the UV index is 7 or greater). Most other solar cookers will not cook in the winter in northern areas (or south of about 35 degrees, either).I thought that a pressure cooker would be great. But the prices in stores were way too high for me. Wait, how about a canning jar? These little beauties are designed to relieve pressure through the lid -- a nice pressure cooker. And cooking time is cut in half for each 10º C we raise the temperature (Professor Lee Hansen, private communication). I used one of my wife's wide-mouth canning jars, spray-painted (flat) black on the outside, and it worked great. Food cooks faster when you use a simple canning jar as a pressure cooker. However, you can also put a black pot in the plastic bag instead if you want. But don't use a sealed container with no pressure release like a mayonnaise jar -- it can break as the steam builds up! (I've done it.)
How to Build Your Own Solar Funnel Cooker
What You will Need for the Funnel Cooker:
1. A piece of flat cardboard, about 2 feet wide by 4 feet long. (The length should be just twice the width. The bigger, the better.)
2. Ordinary aluminum foil. 3. A glue such as white glue (like Elmer's glue), and water to mix with it 50-50. Also, a brush to
apply the glue to the cardboard (or a cloth or paper towel will do). Or, some may wish to use a cheap "spray adhesive" available in spray cans. You can also use wheat paste.
4. Three wire brads-- or small nuts and bolts, or string to hold the funnel together. 5. For a cooking vessel, I recommend a canning jar ("Ball" wide-mouth quart jars work fine for me;
the rubber ring on the lid is less likely to melt than for other jars I've found. A two-quart canning jar is available and works fine for larger quantities of food, although the cooking is somewhat slower.).
6. The cooking jar (or vessel) should be spray-painted black on the outside. I find that a cheap flat-black spray paint works just fine. Scrape off a vertical stripe so that you have a clear glass "window" to look into the vessel, to check the food or water for boiling.
7. A block of wood is used as an insulator under the jar. I use a piece of 2"X4" board which is cut into a square nominally 4" x 4" by about 2" thick. (10cm square x 5cm thick.) One square piece of wood makes a great insulator.
8. A plastic bag is used to go around the cooking-jar and block of wood, to provide a green-house effect. Suggestions:
Reynolds™ Oven Bag, Regular Size works great: transparent and won't melt. (Cost about 25 cents each in U.S. grocery stores.)
Any nearly-transparent HDPE bag (High-density Polyethylene). Look for "HDPE" stamped on the bag. I've tested HDPE bags which I picked up for free at my grocery store, used for holding vegetables and fruits. These are thin, but very inexpensive. Tested side-by-side with an oven bag in two solar funnels, the HDPE bag worked just as well! (Caution: we have found that some HDPE bags will melt should they contact the hot cooking vessel. For this reason, we recommend using the oven-safe plastic bag wherever possible.)
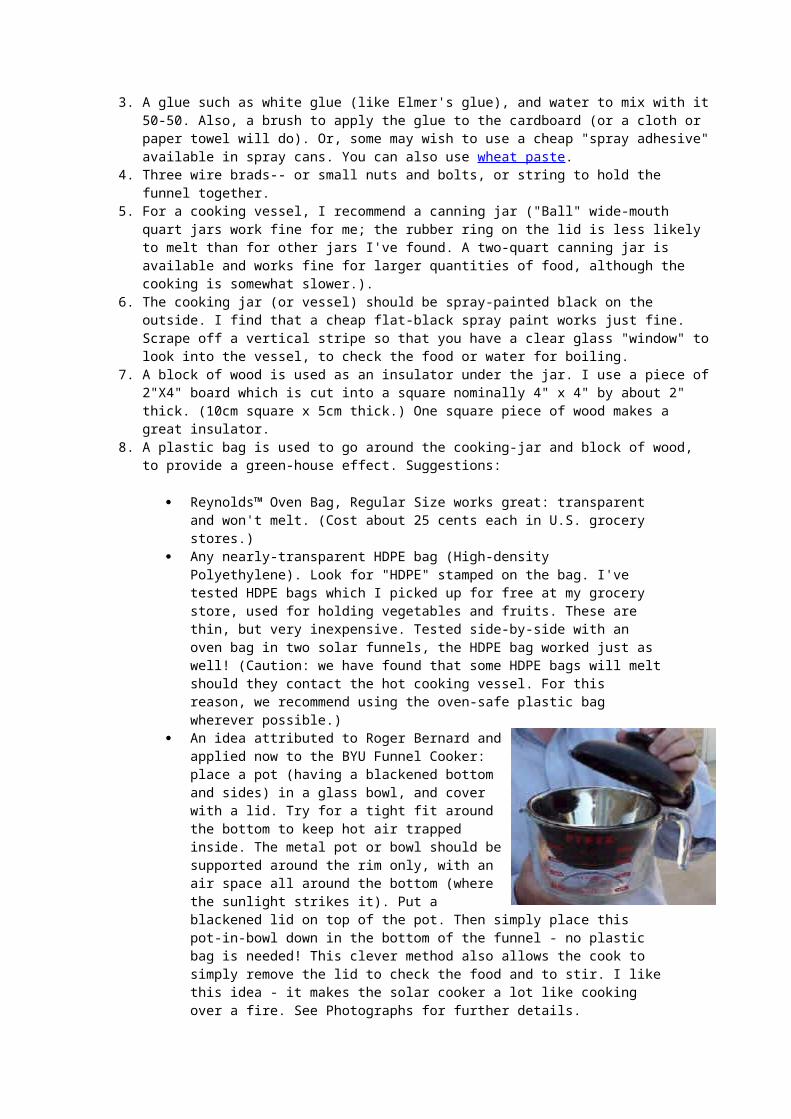
An idea attributed to Roger Bernard and applied now to the BYU Funnel Cooker: place a pot (having a blackened bottom and sides) in a glass bowl, and cover with a lid. Try for a tight fit around the bottom to keep hot air trapped inside. The metal pot or bowl should be supported around the rim only, with an air space all around the bottom (where the sunlight strikes it). Put a blackened lid on top of the pot. Then simply place this pot-in-bowl down in the bottom of the funnel - no plastic bag is needed! This clever method also allows the cook to simply remove the lid to check the food and to stir. I like this idea - it makes the solar cooker a lot like cooking over a fire. See Photographs for further details.
Construction Steps
Cut a Half-circle out of the Cardboard
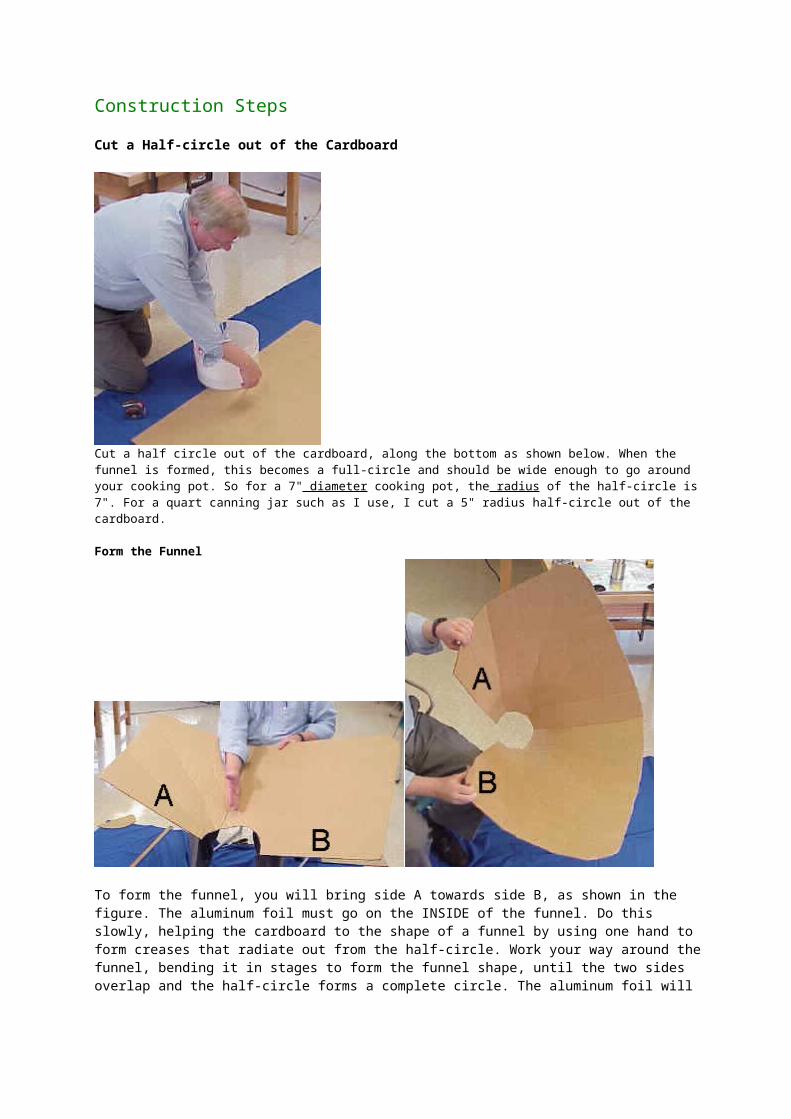
Cut a half circle out of the cardboard, along the bottom as shown below. When the funnel is formed, this becomes a full-circle and should be wide enough to go around your cooking pot. So for a 7" diameter cooking pot, the radius of the half-circle is 7". For a quart canning jar such as I use, I cut a 5" radius half-circle out of the cardboard.
Form the Funnel
To form the funnel, you will bring side A towards side B, as shown in the figure. The aluminum foil must go on the INSIDE of the funnel. Do this slowly, helping the cardboard to the shape of a funnel by using one hand to form creases that radiate out from the half-circle. Work your way around the funnel, bending it in stages to form the funnel shape, until the two sides overlap and the half-circle forms a complete circle. The aluminum foil will go on the INSIDE of funnel. Open the funnel and lay it flat, "inside up", in preparation for the next step.
Glue Foil to Cardboard
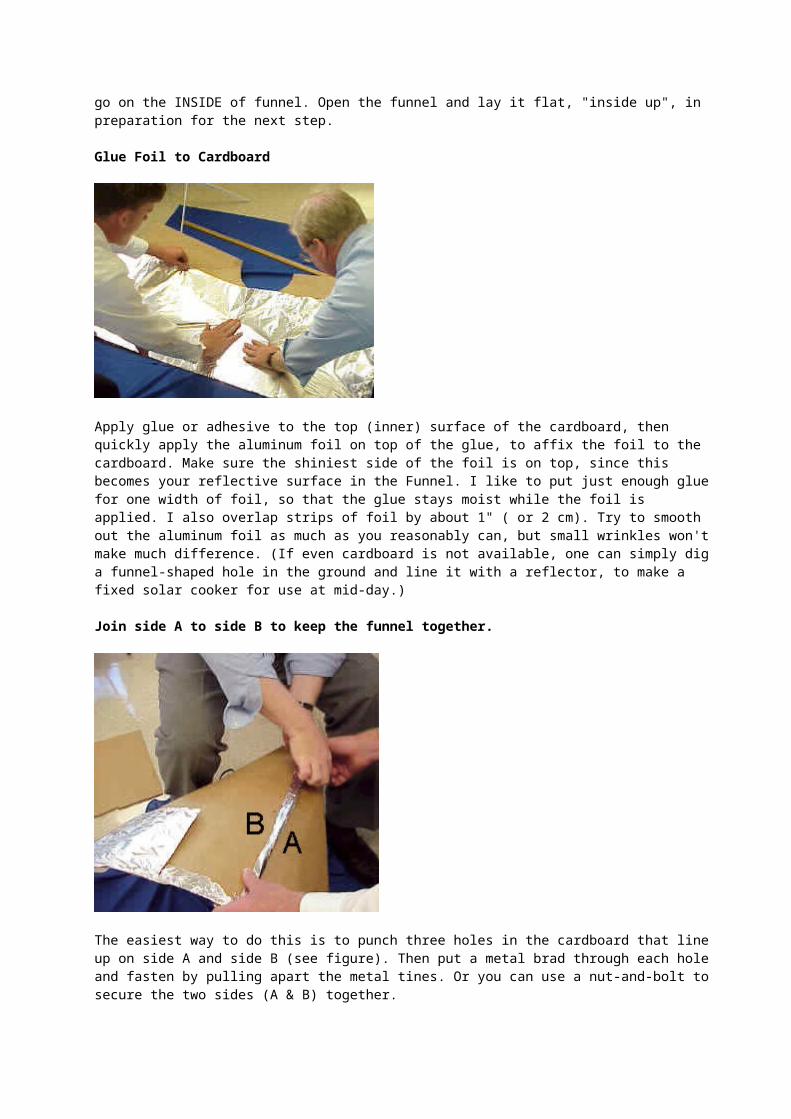
Apply glue or adhesive to the top (inner) surface of the cardboard, then quickly apply the aluminum foil on top of the glue, to affix the foil to the cardboard. Make sure the shiniest side of the foil is on top, since this becomes your reflective surface in the Funnel. I like to put just enough glue for one width of foil, so that the glue stays moist while the foil is applied. I also overlap strips of foil by about 1" ( or 2 cm). Try to smooth out the aluminum foil as much as you reasonably can, but small wrinkles won't make much difference. (If even cardboard is not available, one can simply dig a funnel-shaped hole in the ground and line it with a reflector, to make a fixed solar cooker for use at mid-day.)
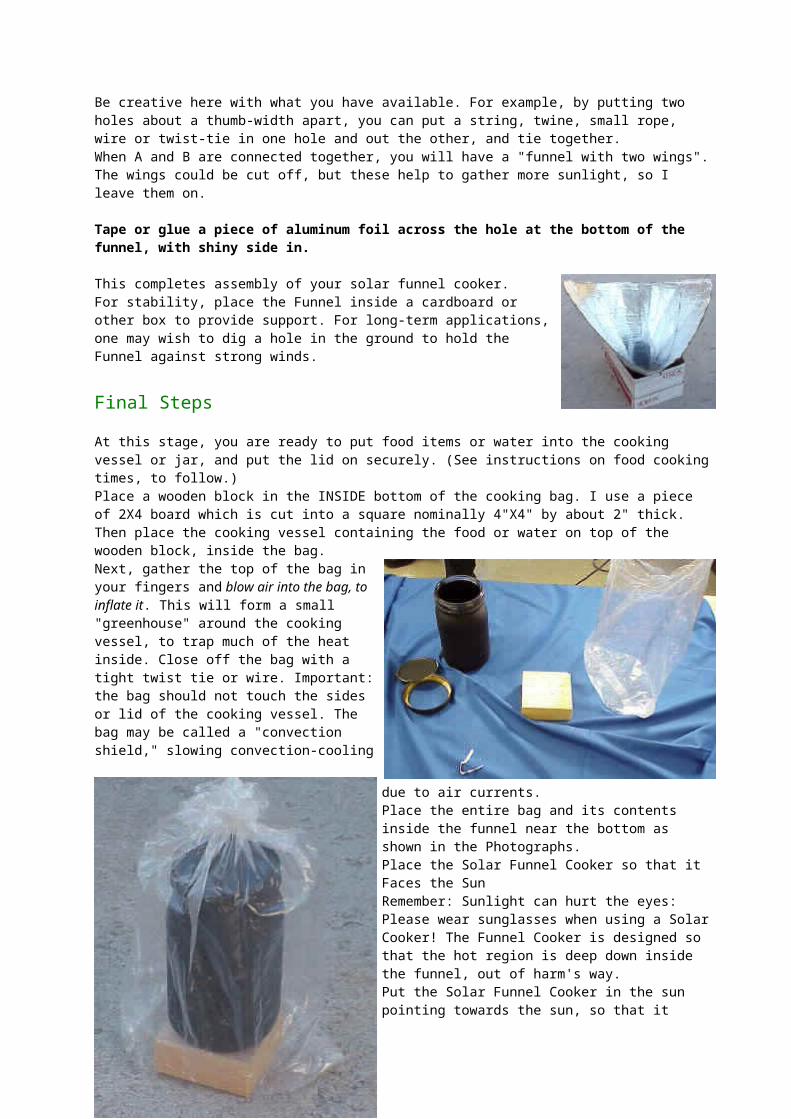
Join side A to side B to keep the funnel together.
The easiest way to do this is to punch three holes in the cardboard that line up on side A and side B (see figure). Then put a metal brad through each hole and fasten by pulling apart the metal tines. Or you can use a nut-and-bolt to secure the two sides (A & B) together. Be creative here with what you have available. For example, by putting two holes about a thumb-width apart, you can put a string, twine, small rope, wire or twist-tie in one hole and out the other, and tie together. When A and B are connected together, you will have a "funnel with two wings". The wings could be cut off, but these help to gather more sunlight, so I leave them on.
Tape or glue a piece of aluminum foil across the hole at the bottom of the funnel, with shiny side in.
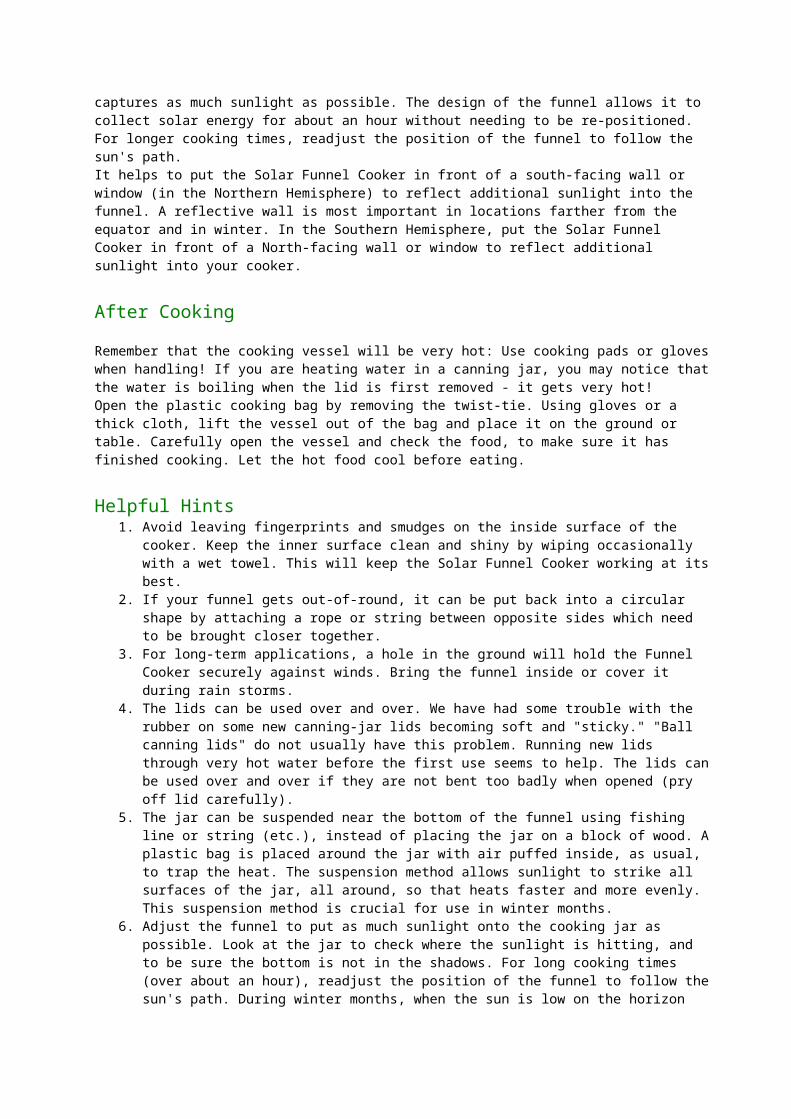
This completes assembly of your solar funnel cooker. For stability, place the Funnel inside a cardboard or other box to provide support. For long-term applications, one may wish to dig a hole in the ground to hold the Funnel against strong winds.
Final Steps
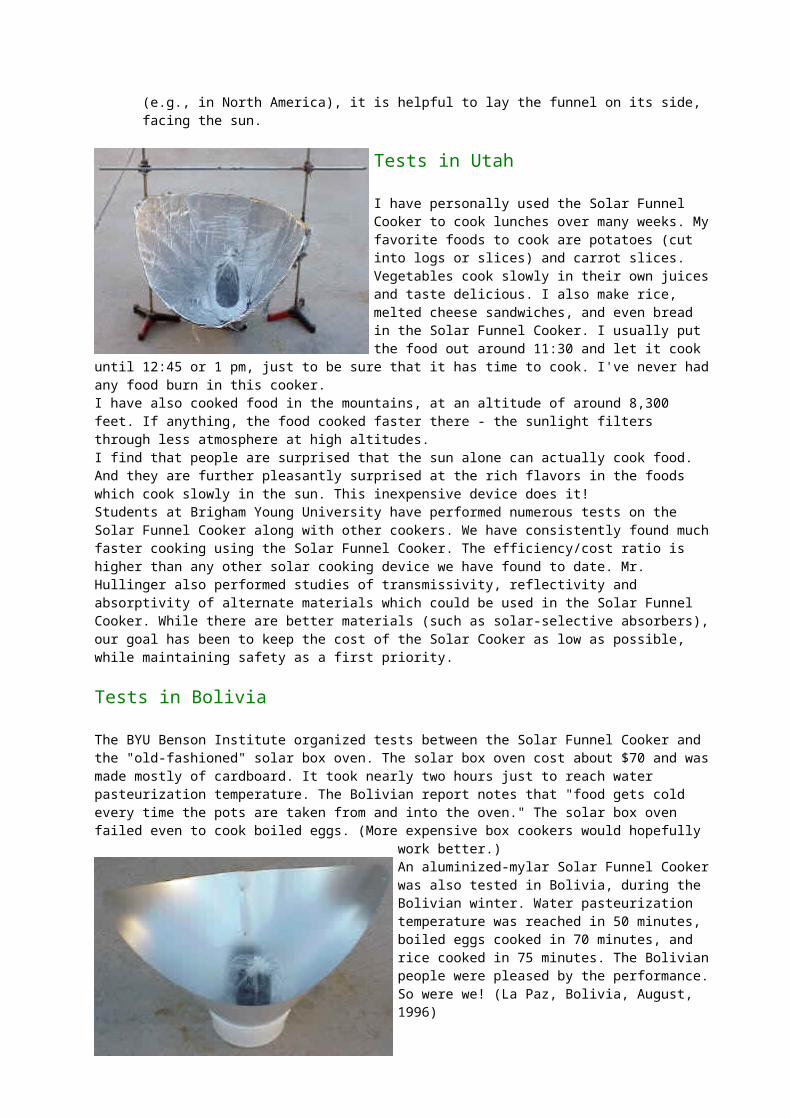
At this stage, you are ready to put food items or water into the cooking vessel or jar, and put the lid on securely. (See instructions on food cooking times, to follow.) Place a wooden block in the INSIDE bottom of the cooking bag. I use a piece of 2X4 board which is cut into a square nominally 4"X4" by about 2" thick. Then place the cooking vessel containing the food or water on top of the wooden block, inside the bag. Next, gather the top of the bag in your fingers and blow air into the bag, to inflate it. This will form a small "greenhouse" around the cooking vessel, to trap much of the heat inside. Close off the bag with a tight twist tie or wire. Important: the bag should not touch the sides or lid of the cooking vessel. The bag may be called a "convection shield," slowing convection-cooling due to air currents. Place the entire bag and its contents inside the funnel near the bottom as shown in the Photographs. Place the Solar Funnel Cooker so that it Faces the Sun Remember: Sunlight can hurt the eyes: Please wear sunglasses when using a Solar Cooker! The Funnel Cooker is designed so that the hot region is deep down inside the funnel, out of harm's way.
Put the Solar Funnel Cooker in the sun pointing towards the sun, so that it captures as much sunlight as possible. The design of the funnel allows it to collect solar energy for about an hour without needing to be re-positioned. For longer cooking times, readjust the position of the funnel to follow the sun's path. It helps to put the Solar Funnel Cooker in front of a south-facing wall or window (in the Northern Hemisphere) to reflect additional sunlight into the funnel. A reflective wall is most important in locations farther from the equator and in winter. In the Southern Hemisphere, put the Solar Funnel Cooker in front of a North-facing wall or window to reflect additional sunlight into your cooker.
After Cooking
Remember that the cooking vessel will be very hot: Use cooking pads or gloves when handling! If you are heating water in a canning jar, you may notice that the water is boiling when the lid is first removed - it gets very hot!
Open the plastic cooking bag by removing the twist-tie. Using gloves or a thick cloth, lift the vessel out of the bag and place it on the ground or table. Carefully open the vessel and check the food, to make sure it has finished cooking. Let the hot food cool before eating.
Helpful Hints 1. Avoid leaving fingerprints and smudges on the inside surface of the cooker. Keep the inner
surface clean and shiny by wiping occasionally with a wet towel. This will keep the Solar Funnel Cooker working at its best.
2. If your funnel gets out-of-round, it can be put back into a circular shape by attaching a rope or string between opposite sides which need to be brought closer together.
3. For long-term applications, a hole in the ground will hold the Funnel Cooker securely against winds. Bring the funnel inside or cover it during rain storms.
4. The lids can be used over and over. We have had some trouble with the rubber on some new canning-jar lids becoming soft and "sticky." "Ball canning lids" do not usually have this problem. Running new lids through very hot water before the first use seems to help. The lids can be used over and over if they are not bent too badly when opened (pry off lid carefully).
5. The jar can be suspended near the bottom of the funnel using fishing line or string (etc.), instead of placing the jar on a block of wood. A plastic bag is placed around the jar with air puffed inside, as usual, to trap the heat. The suspension method allows sunlight to strike all surfaces of the jar, all around, so that heats faster and more evenly. This suspension method is crucial for use in winter months.
6. Adjust the funnel to put as much sunlight onto the cooking jar as possible. Look at the jar to check where the sunlight is hitting, and to be sure the bottom is not in the shadows. For long cooking times (over about an hour), readjust the position of the funnel to follow the sun's path. During winter months, when the sun is low on the horizon (e.g., in North America), it is helpful to lay the funnel on its side, facing the sun.
Tests in Utah
I have personally used the Solar Funnel Cooker to cook lunches over many weeks. My favorite foods to cook are potatoes (cut into logs or slices) and carrot slices. Vegetables cook slowly in their own juices and taste delicious. I also make rice, melted cheese sandwiches, and even bread in the Solar Funnel Cooker. I usually put the food out around 11:30 and let it cook until 12:45 or 1 pm, just to be sure that it has time to cook. I've never had any food burn in this cooker. I have also cooked food in the mountains, at an altitude of around 8,300 feet. If anything, the food cooked faster there - the sunlight filters through less atmosphere at high
altitudes. I find that people are surprised that the sun alone can actually cook food. And they are further pleasantly surprised at the rich flavors in the foods which cook slowly in the sun. This inexpensive device does it! Students at Brigham Young University have performed numerous tests on the Solar Funnel Cooker along with other cookers. We have consistently found much faster cooking using the Solar Funnel Cooker. The efficiency/cost ratio is higher than any other solar cooking device we have found to date. Mr. Hullinger also performed studies of transmissivity, reflectivity and absorptivity of alternate materials which could be used in the Solar Funnel Cooker. While there are better materials (such as solar-selective absorbers), our goal has been to keep the cost of the Solar Cooker as low as possible, while maintaining safety as a first priority.
Tests in Bolivia
The BYU Benson Institute organized tests between the Solar Funnel Cooker and the "old-fashioned" solar box oven. The solar box oven cost about $70 and was made mostly of cardboard. It took nearly two hours just to reach water pasteurization temperature. The Bolivian report notes that "food gets cold every time the pots are taken from and into the oven." The solar box oven failed even to cook boiled eggs.
(More expensive box cookers would hopefully work better.) An aluminized-mylar Solar Funnel Cooker was also tested in Bolivia, during the Bolivian winter. Water pasteurization temperature was reached in 50 minutes, boiled eggs cooked in 70 minutes, and rice cooked in 75 minutes. The Bolivian people were pleased by the performance. So were we! (La Paz, Bolivia, August, 1996) I also donated two dozen solar funnel cookers for people in Guatemala. These were taken there by a group of doctors going there for humanitarian service. The people there also liked the idea of cooking with
the sun's free energy! For an aluminized-Mylar Solar Funnel Cooker kit, please contact CRM (licensed manufacturer) at +1 (801) 292-9210.
Water and Milk Pasteurization
Contaminated drinking water or milk kills thousands of people each day, especially children. WHO reports that 80% of illnesses in the world are spread through contaminated water. Studies show that heating water to about 65º - 70º C (150º F) is sufficient to kill coliform bacteria, rotaviruses, enteroviruses and even Giardia. This is called pasteurization. Pasteurization depends on how hot and how long water is heated. But how do you know if the water got hot enough? You could use a thermometer, but this would add to the cost, of course. When steam leaves the canning jar (with lid on tight) and forms "dew" on the inside of the cooking bag, then the water is probably pasteurized to drink. (The goal is to heat to 160º Fahrenheit for at least six minutes.) With a stripe of black paint scraped off the jar, one can look through the bag and into the jar and see when the water is boiling - then it is safe for sure. Think of all the lives that can be saved simply by pasteurizing water using a simple Solar Cooker! (See also Recent Advances in Solar Water Pasteurization).
Safety
Safety was my first concern in designing the Solar Funnel Cooker, then came low cost and effectiveness. But any time you have heat you need to take some precautions.
The cooking vessel (jar) is going to get hot, else the food inside won't cook. Let the jar cool a bit before opening. Handle only with gloves or tongs.
Always wear dark glasses to protect from the sun's rays. We naturally squint, but sunglasses are important.
Keep the plastic bag away from children and away from nose and mouth to avoid any possibility of suffocation.
Cooking with the Solar Funnel Cooker
What do you cook in a crock pot or moderate-temperature oven? The same foods will cook about the same in the Solar Funnel Cooker -- without burning. The charts below give approximate summer cooking times. The solar cooker works best when the UV index is 7 or higher. (Sun high overhead, few clouds.) Cooking times are approximate. Increase cooking times for partly-cloudy days, sun not overhead (e.g., wintertime) or for more than about 3 cups of food in the cooking jar. Stirring is not necessary for most foods. Food generally will not burn in the solar cooker. Vegetables (Potatoes, carrots, squash, beets, asparagus, etc.)Preparation: No need to add water if fresh. Cut into slices or "logs" to ensure uniform cooking. Corn will cook fine with or without the cob.Cooking Time: About 1.5 hours Cereals and Grains (Rice, wheat, barley, oats, millet, etc.)Preparation: Mix 2 parts water to every 1 part grain. Amount may vary according to individual taste. Let soak for a few hours for faster cooking. To ensure uniform cooking, shake jar after 50 minutes. CAUTION: Jar will be hot. Use gloves or cooking pads.Cooking Time: 1.5-2 hours Pasta and Dehydrated SoupsPreparation: First heat water to near boiling (50-70 minutes). Then add the pasta or soup mix. Stir or shake, and cook 15 additional minutes.Cooking Time: 65-85 minutes BeansPreparation: Let tough or dry beans soak overnight. Place in cooking jar with water.Cooking Time: 2-3 hours EggsPreparation: No need to add water. Note: If cooked too long, egg whites may darken, but taste remains the same.Cooking Time: 1-1.5 hours, depending on desired yolk firmness.
Meats (Chicken, beef, and fish)Preparation: No need to add water. Longer cooking makes the meat more tender.Cooking Time: Chicken: 1.5 hours cut up or 2.5 hours whole; Beef: 1.5 hours cut up or 2.5-3 hours for larger cuts; Fish: 1-1.5 hours BakingPreparation: Times vary based on amount of dough.Cooking Times: Breads: 1-1.5 hours; Biscuits: 1-1.5 hours; Cookies: 1 hour Roasted Nuts (Peanuts, almonds, pumpkin seed, etc.)Preparation: Place in jar. A little vegetable oil may be added if desired.Cooking Time: About 1.5 hours MRE's and prepackaged foodsPreparation: For foods in dark containers, simply place the container in the cooking bag in place of the black cooking jar.Cooking Times: Cooking time varies with the amount of food and darkness of package.
How to Use the Solar Funnel as a Refrigerator/Cooler
A university student (Jamie Winterton) and I were the first to demonstrate that the BYU Solar Funnel Cooker can be used - at night - as a refrigerator. Here is how this is done. The Solar Funnel Cooker is set-up just as you would during sun-light hours, with two exceptions: 1. The funnel is directed at the dark night sky. It should not "see" any buildings or even trees. (The thermal radiation from walls, trees, or even clouds will diminish the cooling effect.). 2. It helps to place 2 (two) bags around the jar instead of just one, with air spaces between the bags and between the inner bag and the jar. HDPE and ordinary polyethylene bags work well, since polyethylene is nearly transparent to infrared radiation, allowing it to escape into the "heat sink" of the dark sky. During the day, the sun's rays are reflected onto the cooking vessel which becomes hot quickly. At night, heat from the vessel is radiated outward, towards empty space, which is very cold indeed (a "heat sink"). As a result, the cooking vessel now becomes a small refrigerator. We routinely achieve cooling of about 20º F (10º C) below ambient air temperature using this remarkably simple scheme. In September 1999, we placed two funnels out in the evening, with double-bagged jars inside. One jar was on a block of wood and the other was suspended in the funnel using fishing line. The temperature that evening (in Provo, Utah) was 78º F. Using a Radio Shack indoor/outdoor thermometer, a BYU student (Colter Paulson) measured the temperature inside the funnel and outside in the open air. He found that the temperature of the air inside the funnel dropped quickly by about 15 degrees, as its heat was radiated upwards in the clear sky. That night, the minimum outdoor air temperature measured was 47.5 degrees - but the water in both jars had ICE. I invite others to try this, and please let me know if you get ice at 55 or even 60 degrees outside air temperature (minimum at night). A black PVC container may work even better than a black-painted jar, since PVC is a good infrared radiator - these matters are still being studied. I would like to see the "Funnel Refrigerator" tried in desert climates, especially where freezing temperatures are rarely reached. It should be possible in this way to cheaply make ice for Hutus in Rwanda and for aborigines in Australia, without using any electricity or other modern "tricks." We are in effect bringing some of the cold of space to a little corner on earth. Please let me know how this works for you.
Conclusion: Why We Need Solar Cookers
The BYU Funnel Cooker/Cooler can: Cook food without the need for electricity or wood or petroleum or other fuels. Pasteurize water for safe drinking, preventing many diseases. Save trees and other resources. Avoid air pollution and breathing smoke while cooking. Use the sun's free energy. A renewable energy source. Cook food with little or no stirring, without burning. Kill insects in grains. Dehydrate fruits, etc. Serve as a refrigerator at night, to cool even freeze water.
(Try that without electricity or fuels! See also Balancing the Scales.) The burden for gathering the fuel wood and cooking falls mainly on women and children. Joseph Kiai reports from Dadaab, Kenya: "Women who can't afford to buy wood start at 4 am to go collecting and return about noon... They do this twice a week to get fuel for cooking... The rapes are averaging one per week." From Belize: "Many times the women have to go into the forest dragging their small children when they go to look for wood. It is a special hardship for pregnant and nursing mothers to chop and drag trees back to the village... they are exposed to venomous snakes and clouds of mosquitoes." (Anna K.) (Quoted in newsletters by Solar Cookers International.) And the forests are dwindling in many areas. Edwin Dobbs noted in Audubon Magazine, Nov. 1992, "The world can choose sunlight or further deforestation, solar cooking or widespread starvation..." Americans should be prepared for emergencies, incident to power failures. A Mormon pioneer noted in her journal: "We were now following in their trail traveling up the Platte River. Timber was sometimes very scarce and hard to get. We managed to do our cooking with what little we could gather up..." (Eliza R. Snow) Now there's someone who needed a light-weight Solar Cooker! Here's another reason to use a solar cooker. Many people in developing countries look to see what's being done in America. I'm told that if Americans are using something, then they will want to try it, too. The more people there are cooking with the sun, the more others will want to join in. A good way to spread this technology is to encourage small local industries or families to make these simple yet reliable solar cookers for others at low cost. I've used this cooker for three summers and I enjoy it. Cooking and making ice with the funnel cooker/cooler will permit a significant change in lifestyle. If you think about it, this could help a lot of people. The BYU Solar Funnel Cooker uses the glorious sunshine -- and the energy of the sun is a free gift from God for all to use!
Answers to commonly-asked questions
Will the cooker work in winter (in the United States)?
As the sun moves closer to the southern horizon in the winter, the solar cooker is naturally less effective. A good measure of the solar intensity is the “UV index” which is often reported with the weather. When the ultraviolet or UV index is 7 or above– common in summer months– the solar cooker works very well. In Salt Lake City in October, the UV index was reported to be 3.5 on a sunny day. We were able to boil water in the Solar Funnel Cooker during this time, but we had to suspend the black jar in the funnel so that sunlight struck all sides. (We ran a fishing line under the screw-on lid, and looped the fishing line over a rod above the funnel. As usual, a plastic bag was placed around the jar, and this was closed at the top to let the fishing line out for suspending the jar.) The solar “minimum” for the northern hemisphere occurs on winter solstice, about December 21st each year. The solar “maximum” occurs six months later, June 21st. Solar cooking works best from about March 20 - October 1 in the north. If people try to cook with the sun for the first time outside of this time window, they should not be discouraged. Try again when the sun is more directly overhead. (One may also suspend the jar in the funnel, which will make cooking faster any time of the year.) It is interesting to note that most developing countries are located near the equator where the sun is nearly directly overhead all the time. Solar Cookers will then serve year-round, as long as the sun is shining, for these fortunate people. They may be the first to apply fusion energy (of the sun) on a large scale! And they may accomplish this without the expensive infrastructure of electrical power grids that we take for granted in America. How do you cook bread in a jar? I have cooked bread by simply putting dough in the bottom of the jar and placing it in the funnel in the usual way. Rising and baking took place inside the jar in about an hour (during summer). One should put vegetable oil inside the jar before cooking to make removal of the bread easier. I would also suggest that using a 2-quart wide-mouth canning jar instead of a 1-quart jar would make baking a loaf of bread easier. What is the optimum “opening angle” for the funnel cooker? A graduate student at Brigham Young University did a calculus calculation over two years ago to assess the best shape or opening angle for the Solar Funnel. Jeannette Lawler assumed that the best operation would occur when the sun’s rays bounced no more than once before hitting the cooking jar, while keeping the opening angle as large as possible to admit more sunlight. (Some sunlight is lost each time the light reflects from the shiny surface. If the sunlight misses on the first bounce, it can bounce again and again until being absorbed by the black bottle.) She set up an approximate equation for this situation, took the calculus-derivative with respect to the opening angle and set the derivative equal to zero. Optimizing in
this way, she found that the optimum opening angle is about 45 degrees, when the funnel is pointed directly towards the sun. But we don’t want to have to “track the sun” by turning the funnel every few minutes. The sun moves (apparently) 360 degrees in 24 hours, or about 15 degrees per hour. So we finally chose a 60-degree opening angle so that the cooker is effective for about 1.2 hours. This turned out to be long enough to cook most vegetables, breads, boil water, etc. with the Solar Funnel Cooker. We also used a laser pointer to simulate sun rays entering the funnel at different angles, and found that the 60-degree cone was quite effective in concentrating the rays at the bottom of the funnel where the cooking jar sits. See also: Tests of the Solar Funnel and Bowl Cookers in 2001
For questions regarding the complete Solar Funnel Cooker kit using aluminized Mylar and a jar for the cooking vessel, please contact CRM at +1 (801) 292-9210. Recent updates to this project can be found at http://physics1.byu.edu/jones/rel491/solarbowl.htm.
(en mylar)
casserole en pyrex.
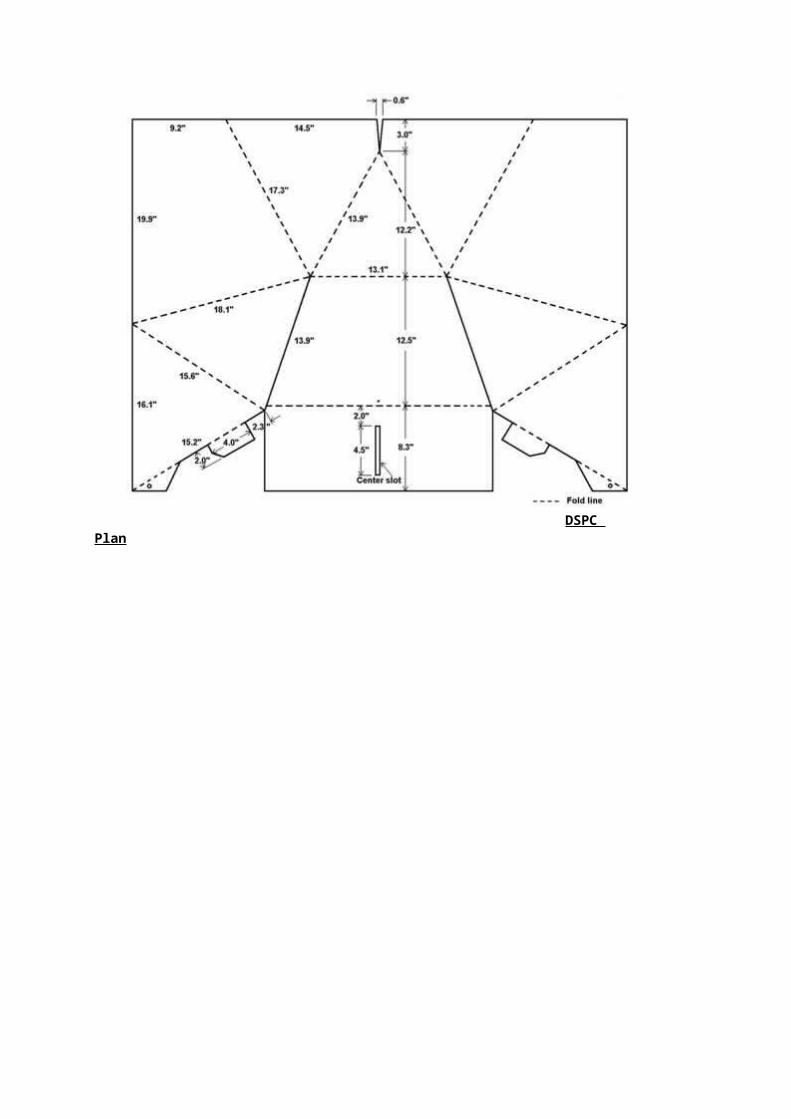
10 The Dual-Setting Panel Cooker (DSPC)
By Teong H. Tan When I was living in Malaysia, a country very close to the Equator, my homemade Cookit performed less efficiently when the sun altitude was very high. It appears that the sun altitude range, in the Tropics and some Temperate Zone during the summer, may be too large for fixed setting panel cooker to perform efficiently throughout. The Dual-Setting Panel Cooker (DSPC) described here is designed to lessen this effect, by using two different settings, to better concentrate sunlight according to the sun altitude. DSPC is made from a single sheet of cardboard or plasticboard, measuring 4’ x 3’, with aluminum foil on one side (see DSPC plan below). DSPC is low cost, simple and quick to construct, and it can also be mass-produced easily. First draw DSPC pattern, according to plan, onto a 4’ x 3’ cardboard. Cut along the solid lines, and fold along the dash lines. Make sure all fold lines are well folded so that the cooker can freely assume its proper shape when set up. Make the center slot width equivalent to the thickness of two sheets of cardboard stack together. Next glue on the aluminum foil, and the cooker is ready for use.
DSPC Plan
For low-sun altitude cooking, below 65 degrees, the two forward triangular panels, on each DSPC side wing, are placed under the trapezoidal base (see photo on the right). In this setting, DSPC functions and performs pretty much the same as the Cookit. The forward rectangular panel can either lie flat or propped up, with a small object, for the proper reflection angle as required. For high-sun altitude cooking, above 60 degrees, the two forward triangular panels, on each DSPC side wing, are placed over the trapezoidal base. The two small flaps will fit
inside the center slot, on the forward rectangular panel, to hold the cooker shape (see photo on the right). In this setting, DSPC performs more efficiently with extra panels. If required, tying the two forward triangular flaps together with a short string will bring the two forward triangular panels even closer. To cook, first configure DSPC according to the sun altitude. Face the cooker towards the sun. Put foods inside a black metal pot, and enclosed the pot in an oven bag or a clear glass container/casserole. Place the pot in the middle of DSPC’s base. Raise the cooking pot by about two inches above the base, using trivet or wire cage, to bring the pot into the proper focus of the cooker. For high-sun altitude setting, raising the pot allows pot with diameter greater than 7.5 inches to be used because the added reflective panels in the front restrict space available at the base level.
11 Windshield Shade Solar Funnel Cooker
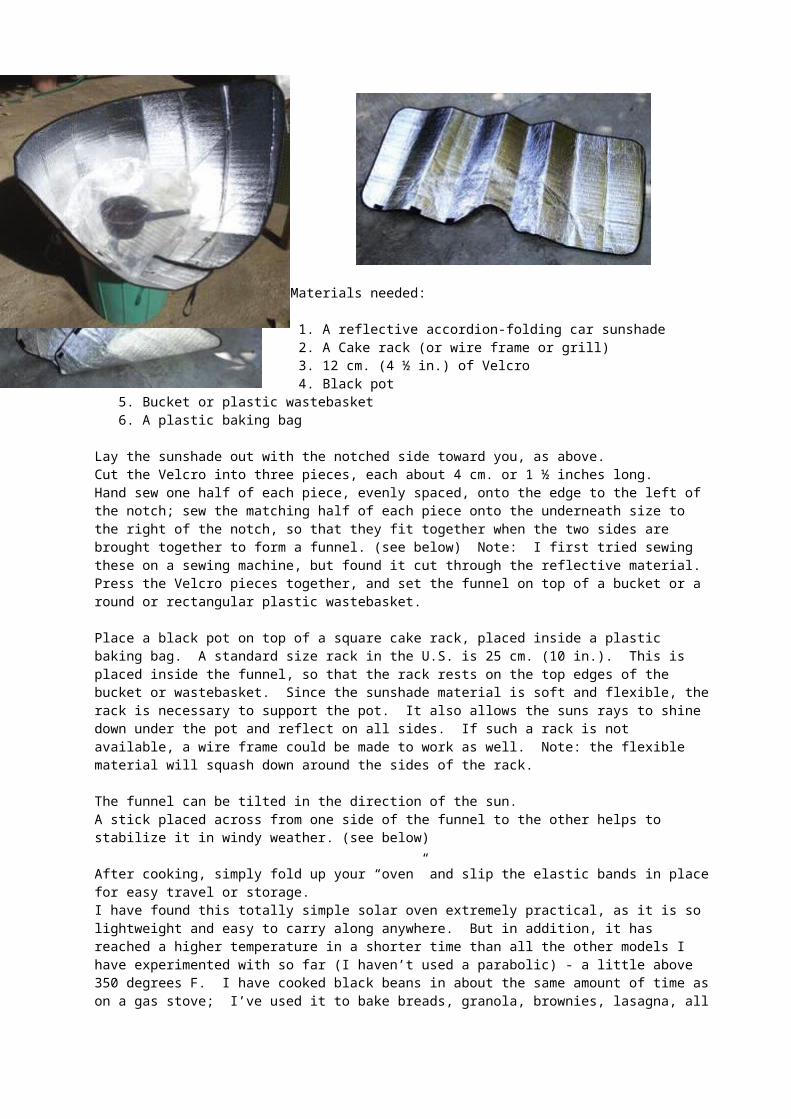
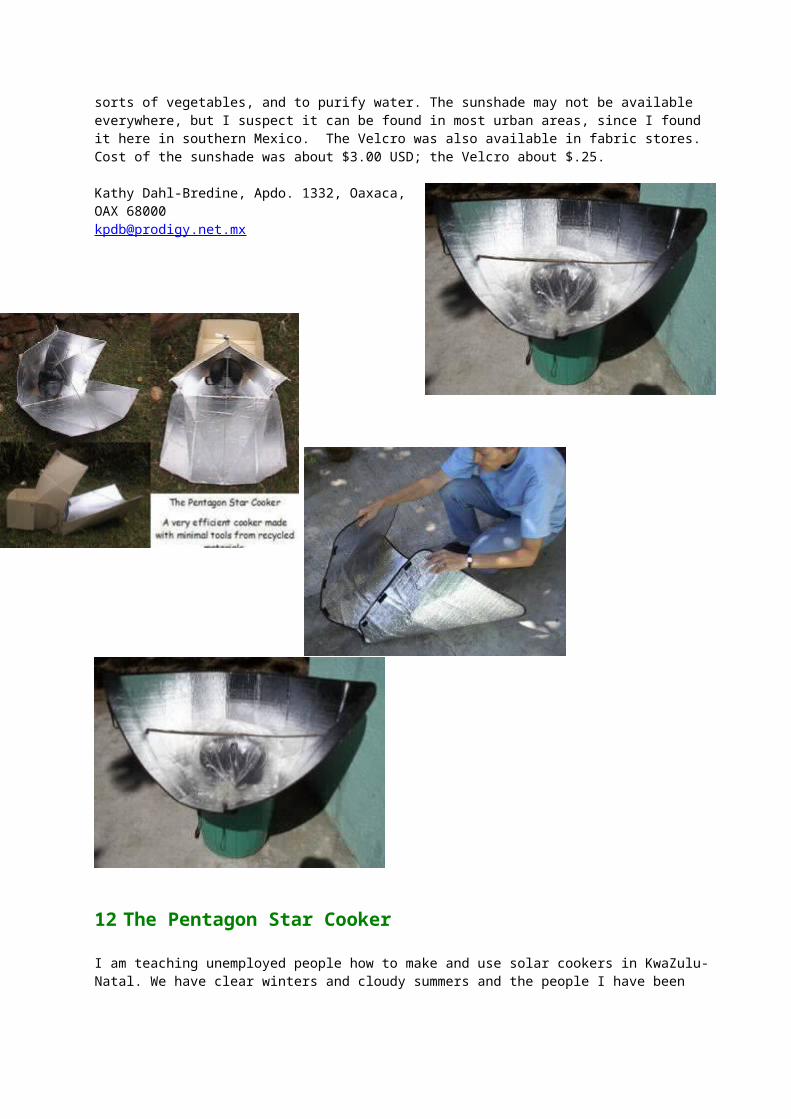
While experimenting with various designs of cookers over the past year to introduce in the indigenous communities where I live and work in southern Mexico, I hit upon an utterly simple way to make an instant portable solar oven. Taking a reflective accordion-folded car windshield shade, you can turn it into a version of the solar funnel, by simply sewing on little Velcro tabs along the long notched side. Here’s how:
Materials needed:
1. A reflective accordion-folding car sunshade 2. A Cake rack (or wire frame or grill)
3. 12 cm. (4 ½ in.) of Velcro 4. Black pot 5. Bucket or plastic wastebasket 6. A plastic baking bag
Lay the sunshade out with the notched side toward you, as above. Cut the Velcro into three pieces, each about 4 cm. or 1 ½ inches long. Hand sew one half of each piece, evenly spaced, onto the edge to the left of the notch; sew the matching half of each piece onto the underneath size to the right of the notch, so that they fit together when the two sides are brought together to form a funnel. (see below) Note: I
first tried sewing these on a sewing machine, but found it cut through the reflective material. Press the Velcro pieces together, and set the funnel on top of a bucket or a round or rectangular plastic wastebasket. Place a black pot on top of a square cake rack, placed inside a plastic baking bag. A standard size rack in the U.S. is 25 cm. (10 in.). This is placed inside the funnel, so that the rack rests on the top edges of the bucket or wastebasket. Since the sunshade material is soft and flexible, the rack is necessary to support the pot. It also allows the suns rays to shine down under the pot and reflect on all sides. If such a rack is not available, a wire frame could be made to work as well. Note: the flexible material will squash down around the sides of the rack.
The funnel can be tilted in the direction of the sun.A stick placed across from one side of the funnel to the other helps to stabilize it in windy weather. (see below)
After cooking, simply fold up your “oven” and slip the elastic bands in place for easy travel or storage.I have found this totally simple solar oven extremely practical, as it is so lightweight and easy to carry along anywhere. But in addition, it has reached a higher temperature in a shorter time than all the other models I have experimented with so far (I haven’t used a parabolic) - a little above 350 degrees F. I have cooked black beans in about the same amount of time as on a gas stove; I’ve used it to bake breads, granola, brownies, lasagna, all sorts of vegetables, and to purify water. The sunshade may not be available everywhere, but I suspect it can be found in most urban areas, since I found it here in southern Mexico. The Velcro was also available in fabric stores. Cost of the sunshade was about $3.00 USD; the Velcro about $.25.
Kathy Dahl-Bredine, Apdo. 1332, Oaxaca, OAX [email protected]
12 The Pentagon Star Cooker
I am teaching unemployed people how to make and use solar cookers in KwaZulu-Natal. We have clear winters and cloudy summers and the people I have been helping have little or no money. I developed this cooker for use here and it works so well that I felt it would be of use else ware.
This is a great cooker. Out side the tropics a straight panel cooker battles on all but the best days and this cooker takes advantage of lower sun angles in morning and afternoon. Being more efficient it makes up for the odd cloud in the day. It is stable in wind and if put together with paper fasteners can fold down flat for storage. Seasonal changes are made by adjusting the side flaps up or down.
Most medium sized boxes work, a short side of 350 mm to 500 mm and a height slightly more than the width works best. Four short cuts and a few simple folds is all that is required there is no waste and a whole box is used.
Paint the un-foiled sections of the cooker to guard against moisture.To cook, place food in a black pot or black painted jar, place the food and container in an oven bag close up with a clothes peg and place on card board scrap in the back corner of the reflector. Now place in full sun and adjust straight into the sun by the cookers shadow.
Richard Pocock, Solarworks, 81 Archer Crescent, Manor Gardens, Durban 4001, KwaZulu-NatalSouth Africa, [email protected]
Whole collapsed box cut, though both sides on the line of the shorter side. This will leave youwith two half boxes on shorter that the other
Shorter piece top reflector longer piece bottom reflector and back support and storage bin
Fold up side back flaps from the remaining card at the back and fasten together.

Draw and crease on dotted line. Cut short line up to diagonal. Foil the top reflector and front reflector before assembly. Glue or sew together or to make a collapsible cooker fasten with paper fasteners. Save the two cut off corners of the top reflector for pot insulators.
13 Parvati Solar Cooker (Twelve Sided)
Construction of Parvati solar cooker (Twelve sided) is given below
This is Modified Dual angled Funnel Cooker made in 12 sections. This is similar to DATS design of Teong H. Tan.There is one minor difference between design of these two cookers. Apperture size of Teong H. Tan's cooker is 36 inches while that of Parvaticooker is 24 inches and ratio of length of sides. Solar ray reflection of both the cookers is shown in Fig A and B. We have not done comparative study between these two designs so far.
Fig. A : DATS ( Teong H. Tan) Fig. B : Parvati Cooker. Dimensions of single section are given in Fig.1. These dimensions are for cooker having rim diameter of 2 feet. For rim diameter of 3 feet and 4 feet multiply these dimensions by 1.5 and 2 respectively.
Fig1. To simplify the construction we decided to make it out of single sheet of aluminum or cardboard instead of making multiple section and joining them together. Apart from simplifying construction this strengthened the cooker.

Take a rectangular sheet of dimension 24” * 48”. Draw a semicircle of 24” radius. Divide this semicircle into 12 equal parts by replicating 12 times the drawing of single section. Complete drawing resembles as shown is fig 3. The drawn portion is cut along the edge. You will have the sheet now as shown in fig 2.
Next you have to bend this to form solar cooker. First bend the “A” parts of all sections to the angle of 135 degrees with part “B”. Then bend part “B” of all sections to the angle of 165 degrees with Part “C”.Now start bending all “C” parts on the inner side so that each “C” part makes an angle of 165 degrees with next one. After bending is complete join together two ends of “C” parts by using paper strip and glue. For aluminum sheet use nut bolt and connecting strips.All “B” parts will form the lower cone while all ”A” parts will form the part of base. A circular disc of the diameter of 7" has to be fitted to bring together all “A” parts. For cardboard paste the ring. Then paste reflective paper or aluminum foil. For aluminum cooker aluminum disc has to be bolted. The photograph of aluminum disc bolted is shown in the photograph. This completes the construction of Cooker. The inner surface of aluminum cooker will need polishing and protective coating.
Parvati Solar cooker and Full size plans available. Please send in you comments and queries.
Contact or E-mail to Mrs. Shobha Ravindra Pardeshi, A-3/3 Saudamini Co-op Hsg. Society, Bhusari Colony, Paud Road, Kothrud, Pune India Pin 411 029. Ravindra Pardeshi
14 Dual angled funnel cooker :Parvati Solar Cooker
De Shobha Pardeshi
First of our project is " Low Cost Solar Cooker ". For this we selected Funnel Cooker by Dr. Steven E. Jones While our experiments were being carried out we had found out that stacking of pots works better than placing them them side by side in funnel cooker. See these results here. Hence we considered the total size of stacked cooking pots as 6 inches dia. And 6 inches height.
We decided to improve this design. From the drawing we decided on a meeting point of Sunlight that are reflected from the rim of the cone. ( Point 'x' in figure1). The second cone of 900 was started from this level( The reference for this was taken from Prof. Mann's (1981) improvement to VITA design ). The length of 900 cone section was taken as 6.25 inches. The base was closed and made reflective, so that any sunlight passing from sides of cooking pot is reflected back. The diagram of this with sunlight reflection is shown in Fig 2. From the diagram concentration of sunlight on cooking pot is clearly seen. This cooker is useful for unattended cooking. Reflections of sunlight with respect to position of Sun for -60 minutes to +60 minutes is shown in fig 3. We had used pressure cooker cooking pots in stacked position with plastic cover. Opening diameter of this cooker is 24 inches. Basically this is a duel angle funnel cooker. We have Named it as 'Parvati Solar cooker'.
FIG 1 FIG 2 FIG 3
How to make and use Parvati Solar Cooker Construction of Parvati low cost Parvati solar cooker is given below
As explained earlier Parvati Solar Cooker is Modified Funnel Cooker. This is made out of three sections. The reflector part is made out of cardboard. Stainless steel sheet also can be used as it is more durable We have constructed two types a) Circular type b) Twelve sided type Construction of circular type is given here and twelve sided version is given at Next page.
Design of Parvati Solar cooker: (Circular type)
Circular Parvati Solar cooker is made of three sections. Part C forms the upper section. Part B forms the lower section and part A forms the base of the cooker. How to cut these three parts from a single sheet of cardboard or aluminum or stainless steel sheet is shown in Fig 4 . Detailed dimensions for 24 inch diameter cooker are shown in Fig 5. This collector can collects heat energy equivalent to about 300 watts. For higher energy diameter of 30 , 36, 48 or higher can be used. For these sized collectors multiply the given dimensions by 1.25, 1.5 or 2 respectively.Part C is semicircle shaped. Outer radius is 24 inches and inner radius is 16 inches. Join two end of this semicircle to form the upper section of cone.Part B has outer radius of 12 inches, next circle is of radius 11.3 inches and third circle of radius 4.8 inches. Part B is 255 degrees section of circle. Join two end of this section to form the middle section of cone. Part B has collar space to join it to Part C.Part A is base of the structure. It is made of circle of radius 4..0 inches. There is another circle seen inside with same center. It's radius is 3.6 inches. This collar space is for joining the base to part B. The construction is shown Fig 6Construction Tips: Small V-cuts are to be made in collar space of Part B and Part A. Then bend these V-cuts on inside. This will make it easy to join together the parts together this is shown in Fig 6. To make the structure sturdy and durable we have pasted brown paper on external surface of the cooker. After pasting the paper we have found the structure became stiff and does not need any support.
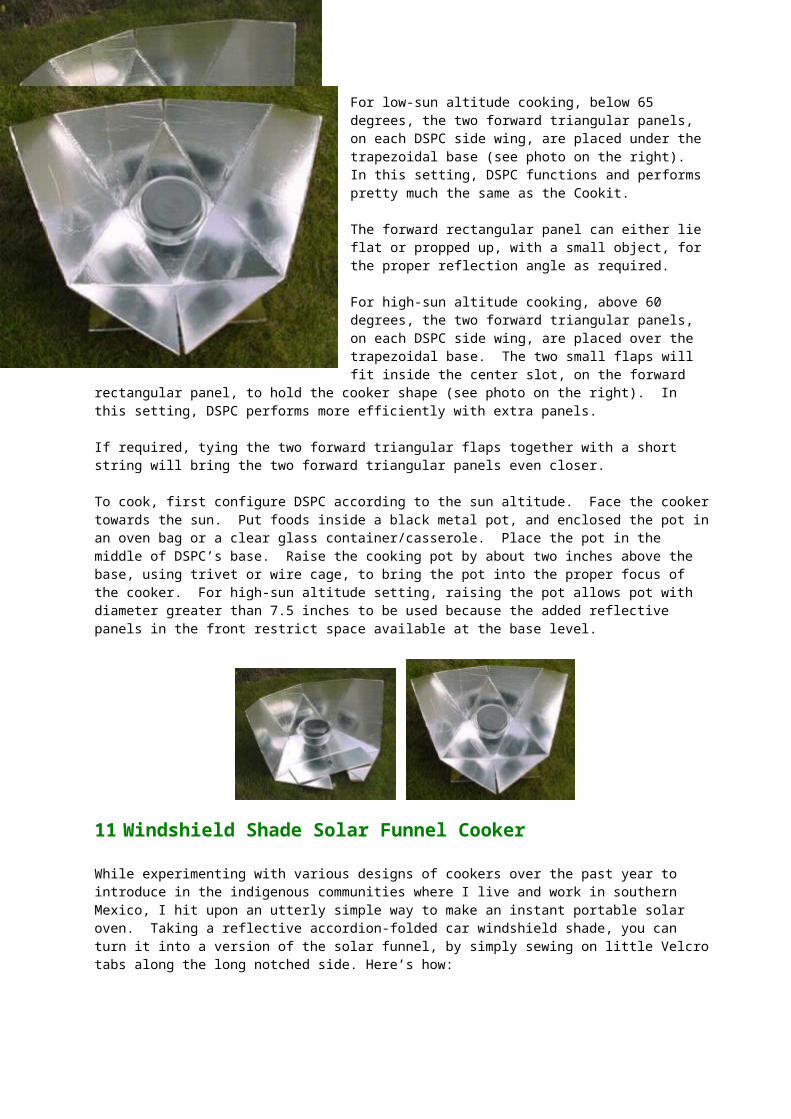
FIG 4 FIG 5
Small V-cuts are made in collar space it makes easy to join the parts together
Fig 6
Three sections are cut from the cardboard Join two ends of part 'C' to make upper part of the cone
Join two ends of part 'B' to make lower part of the cone
Join all three parts to form the reflector
Paste aluminum foil or other reflective surface Completed reflector Reflector, Cooking pots, Stands,
Plastic cover
Using the PARVATI Solar Cooker
Since Parvati solar cooker is modified version of funnel cooker it's use is identical. We have used a metallic stand to place the conical reflector. Another small tripod stand is used to place the cooking pot. As stated earlier we are using three pots in stacked position to cook the food. To retain the heat plastic cover is used. Instead of directly placing the plastic cover a small metallic stand is made and plastic bag is fitted on that. This cover is sufficiently big so that is does not touch the cooking pots. An arrangement is made for focusing. Instead of focusing pin we have made simple arrangement. On a small metallic plate fixed to the rim of reflector a Nut bolt of 1/4 inch diameter and two inch long is fixed with two round washers at two ends. When the cooker is properly focused shadow of upper washer coincides with the washer on the metal plate. As shown in figure while focusing it is better to adjust position in such a way that shadow of upper washer is slightly on the west so that sun tracking error is taken care of.
Focusing ArrangementWhile focusing, shadow of upper washer adjusted towards west
Stacked Cooking pots
Small stand is placed at bottom of the reflector
Stacked pots are placed on the stand
Plastic Cover is put on for green house effect
Left for cooking for about 90 minutes
Using Cooking pots in the Stacked Position
Sometimes it is necessary to cook multiple dishes. We in India generally have Rice, Curry, a Vegetable and Rotis. We have have successfully cooked Rice, Curry and a vegetable ( Potato and Cauliflower) in this cooker. Time taken for cooking was 90 minutes. Bread pudding was also made. While cooking multiple dishes we placed Rice in lower pot, Curry in middle pot and Vegetables in upper pot. The food items that need more heat and time should be placed in the middle pot where it cooks better. Availability of cookers and full size plans.
Parvati Solar cooker and Full size plans available. (Full size Plans only printed copies available.)Please send in you comments and queries.
Contact or E-mail to, Mrs. Shobha Ravindra Pardeshi, A-3/3 Saudamini Co-op Hsg. Society, Bhusari Colony, Paud Road, Kothrud, Pune India Pin 411 029. Ravindra PardeshiSource : http://www.angelfire.com/80s/shobhapardeshi/ParvatiCooker.html
List of my Favorite Links :1. Solarcooking.org2. Ashok K KundapurVoir : http://ashokk_3.tripod.com/solar4.htm 3. http://www.angelfire.com/
15 (DATS) Cuiseur solaire à angle double avec douze côtés
(Note du rédacteur: SCI n'a pas examiné ce cuiseur pour la sûreté, l'efficacité, la stabilité, ou la facilité d'utilisation)
par Teong H. Tan
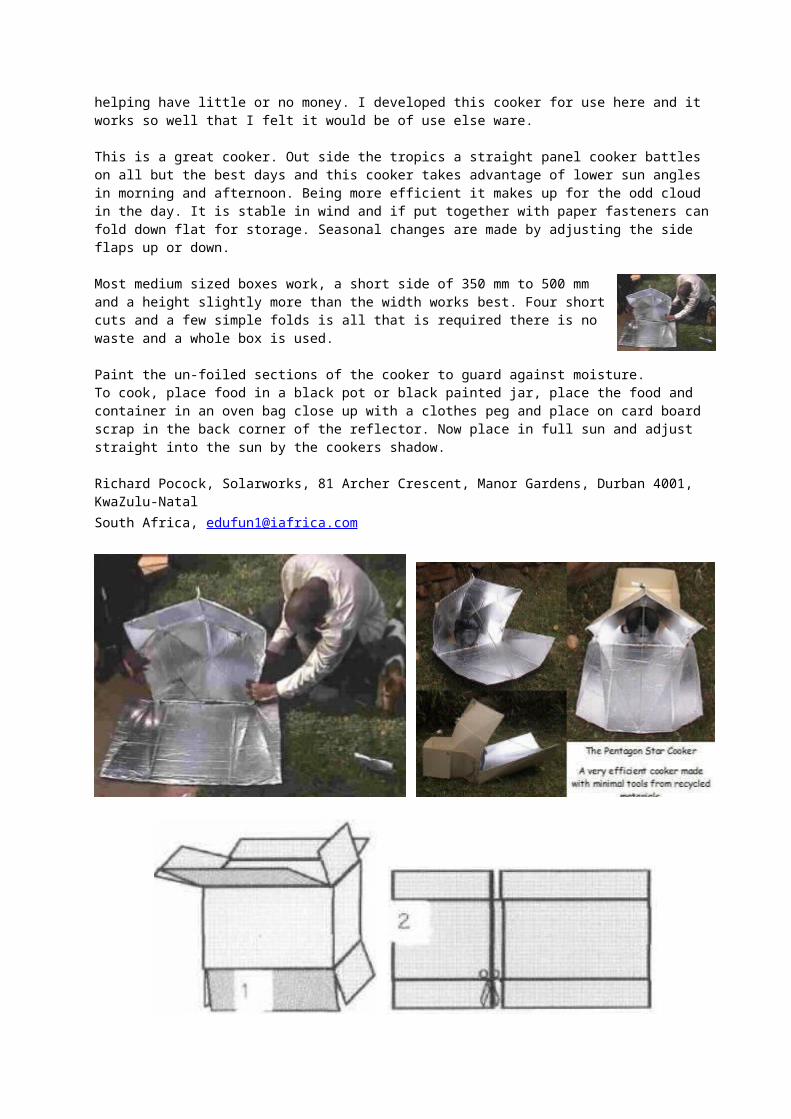
J'ai été présenté au monde de la cuisine solaire en 1982 où, en tant qu'étudiant, je travaillais à l'chaleur-transfère l'expérience à l'institut de recherche de recherche de croisillon à Montréal. Attachez a eu peu avant cela a expérimenté avec et a examiné une variété de cuiseurs solaires. Beaucoup d'années avaient passé près pour moi sans toute autre exposition solaire de cuisine jusqu'à ce que j'aie découvert le web site de Solar Cookers International il y a trois ans. L'emplacement a depuis deviennent l'endroit où je me accroche vers le haut aux activités solaires de cuisine.
Fond
Le CooKit est un de mes cuiseurs solaires préférés. Après avoir eu connaissance des difficultés que
beaucoup de gens font face à localiser les sacs anti-caloriques, et à éprouver comment les sachets en plastique ordinaires fondent sur le contact avec les pots chauds de cuisine, j'a commencé à explorer la possibilité d'un coût simple et bas, facile de construire le cuiseur qui n'exige aucun sachet en plastique. J'ai conçu un que j'appelle (DATS) cuiseur solaire Cuiseur Solaire de Double-Angles avec Douze Cote. Il semble faire le travail des jours clairs et ensoleillés.
Le cuiseur de DATS utilise 24 petits panneaux r3fléchissants pour concentrer la lumière du soleil supplémentaire pour compenser la perte de chaleur de ne pas employer un sachet en plastique. La conception de cuiseur de DATS est semblable à un cuiseur parabolique de profond-foyer, mais au lieu d'employer une véritable courbe parabolique, les panneaux plats multiples concentrent la lumière du soleil sur le pot de cuisine. Deux surface-angles r3fléchissants, 45 le º et le º 60 , sont employés de sorte qu'une courbure puisse être présentée dans l'intervalle pour que la rigidité structurale tienne la forme de cooker?s. Cette rigidité structurale tient compte pour que le cuiseur de DATS soit construit hors du matériel de carton.
Un cuiseur de DATS, examiné à Changhaï, a atteint une température maximale 140 C (284 º F) à l'intérieur d'un pot noir vide de cuisine, un jour ensoleillé clair avec 21 º C (température de l'air ambiante de 70 º F) et une légère brise. Les oeufs sont devenus durs en 30 minutes et deux tasses de riz cuites en 95 minutes. Le cuiseur devrait être replacé toutes les 45 minutes ou moins pour une meilleure efficacité.Une structure porteuse simple, fabriquée à partir de les bâtons en bambou ou en bois, est intégrée comme une pièce intégrale de cuiseur de DATS pour soutenir le pot de cuisine à la position désirée de cuisine.
Le cuiseur de DATS est jugé rigide par une corde, qui lie chacun des douze 45 º - panneaux ensemble à l'extrémité inférieure. La corde est rendue tendue par le vrillage dans la boucle lâche de corde autour d'un bâton court. Plus la corde est serrée, meilleures les prises de cuiseur de DATS sa forme. Si nécessaire, une petite corde de mesure, attachée à travers deux panneaux opposés, 3:00 heures et à la position 9:00 heures, peut être employée pour tirer dedans le mou dans la forme de cuiseur due à la pesanteur. En détachant la corde et en enlevant la structure porteuse de pot de cuisine, le cuiseur de DATS peut être plié pour le stockage ou le transport.
Les matériaux exigés sont le papier d'aluminium de carton et, le ruban de colle et perforé blanc, les petits bâtons de bambou ou du bois, et la corde.
Construction
Coupez 12 morceaux rectangulaires de carton mesurant 24cm x 6çm pièce.
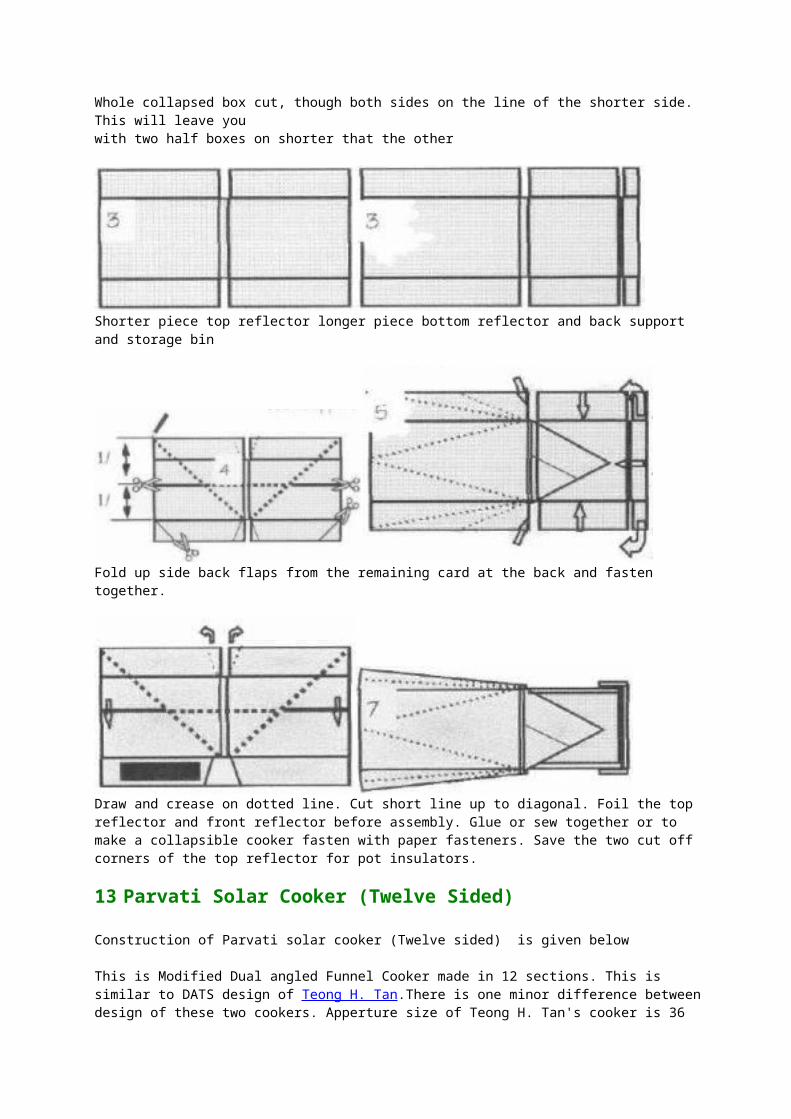
Tracez et coupez la forme suivante sur chaque panneau de carton. Faites un pli droit à la distance de 24cm de la petite extrémité du panneau. Poinçonnez un trou dans chacun des deux?ears? à l'extrémité étroite du panneau, comme montrée, et pliez les oreilles loin de vous.
Placez les panneaux côte à côte, le long du plus long bord de chaque panneau, et attachez- du ruban adhésif leur ensemble jusqu'à ce que chacun des 12 panneaux soit joint à la forme un anneau. Collez le papier d'aluminium sur toutes les surfaces intérieures du cuiseur.
Attachez du ruban adhésif ensemble aux panneaux le long du plus long côté.
Chacun des 12 panneaux forme un anneau.
Passez une corde par les trous perforés d'oreille à l'extrémité inférieure du cuiseur, pour joindre les panneaux inférieurs ensemble. Tordez la boucle lâche de corde autour d'un bâton court, à prennent le mou dans la corde et forment une sorte parabolique rigide et profonde de forme. Pour l'efficacité supplémentaire, couvrez l'ouverture ronde au fond du cuiseur de disque réfléchissant.
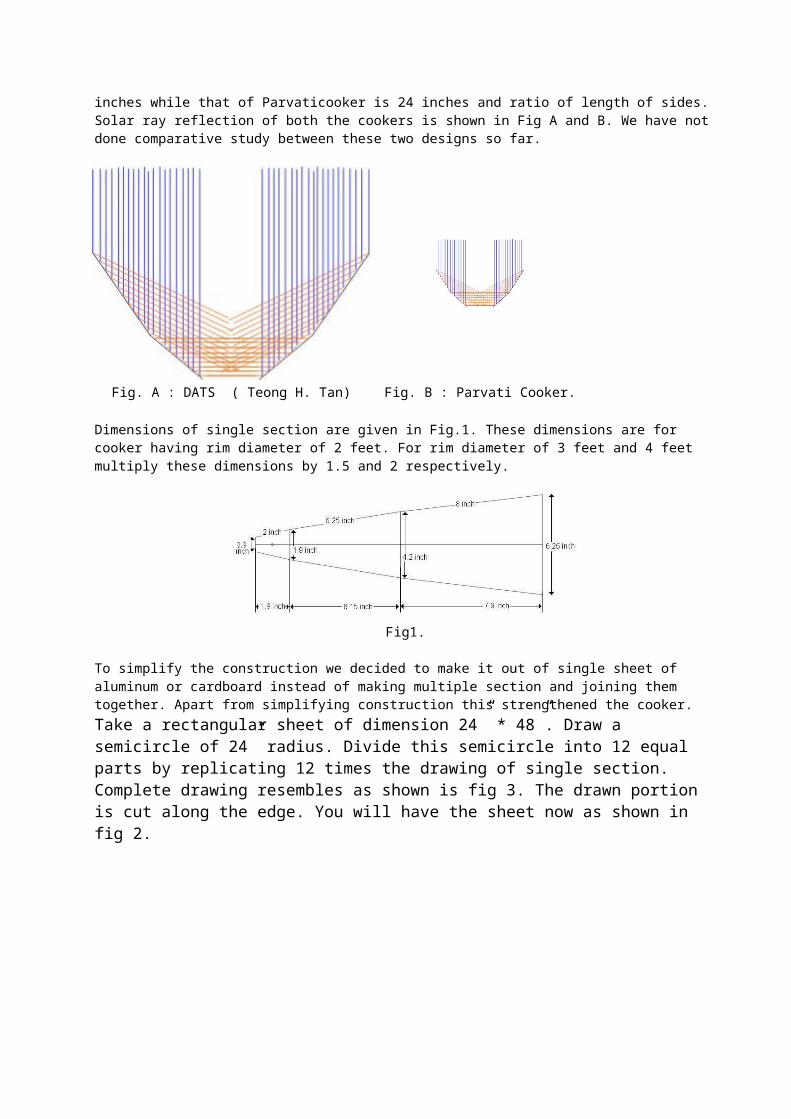
La corde joint des panneaux ensemble.
Le bâton court prend le mou de la corde.
En dehors de la coquille réalisée du cuiseur.
A l'intérieur de la coquille réalisée du cuiseur.
Pour construire l'appui de pot, perforez un petit trou au milieu de la moitié inférieure de quatre de panneaux. Poussez deux bâtons de 35cm-long bambou ou du bois, en parallèle, par les quatre trous, pour former une paire de rails de soutien pour le pot de cuisine. De petits morceaux de carton sont alors collés sur l'extérieur, le long du fond des deux bâtons saillants, pour l'appui de rail additionnel. Attachez les extrémités exposées de bâton sur l'extérieur avec les bandes élastiques pour empêcher les bâtons de glisser. Attachez deux bâtons de 29cm-long bambou ou du bois, perpendiculaires aux rails, et serrez l'extrémité inférieure des bâtons entre les oreilles pliées par panneau inférieur. Reliez les deux jonctions perpendiculaires du rails/sticks à un fil ou à une corde pour la stabilité supplémentaire de pot, en permettant des charges de pot de jusqu'à 2.5kg.
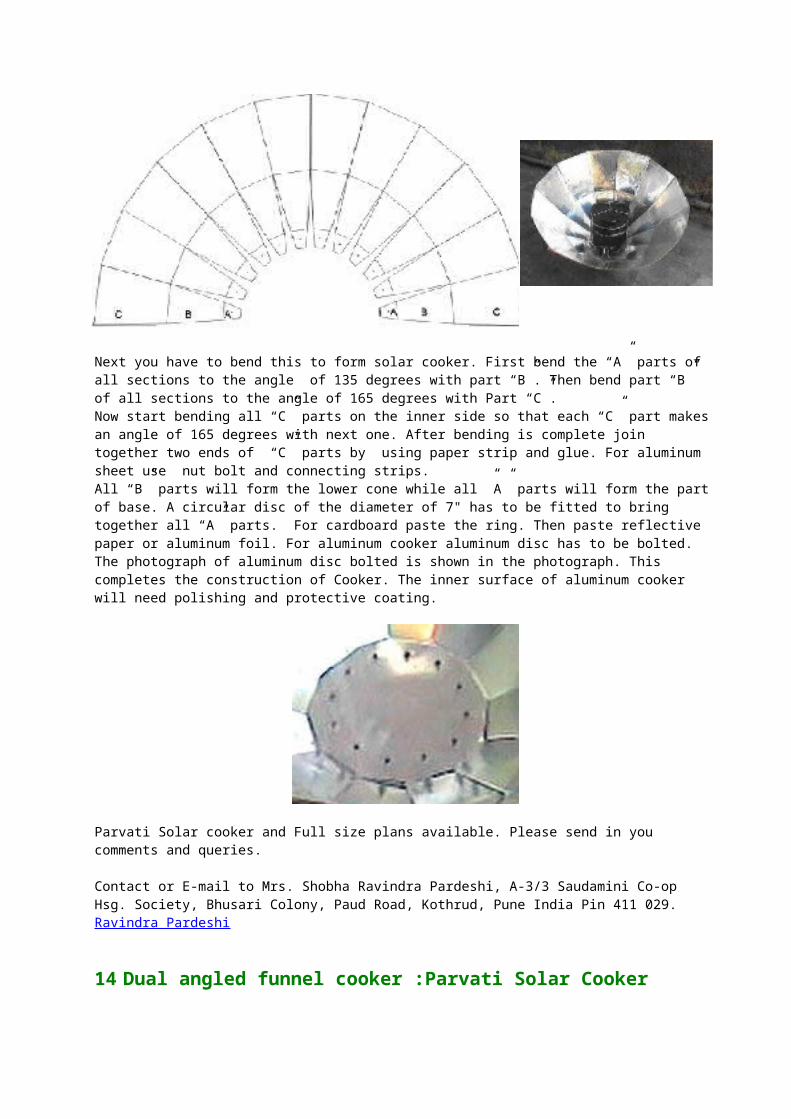
Bâtons saillants avec de petits appuis de carton.
Structure de soutènement réalisée du pot.
Le cuiseur de DATS est maintenant opérationnel. Placez le cuiseur pour faire face au soleil directement. Un pot noir, avec la nourriture à l'intérieur, peut maintenant être appartement placé ou pêché sur les rails de soutien à faire cuire par la chaleur produite de la lumière du soleil reflétée.
Contact: Teong H. Tan, E-mail: [email protected] Source : http://solarcooking.org/francais/DATS-fr.htm
16 Conclusion
1) Les cuiseurs solaires à réglage manuel, en général du type parabole, sont ceux qui cuisent le plus rapidement les aliments (une casserole d’un litre d’eau, bout en moins de 10 mn). Par contre, il faut être à côté pour surveiller la cuisson. D’où la raison du sac plastique transparent, pour éviter de salir la parabole, en cas de débordement. Il sont plus difficiles à construire.
Le cuiseur le plus simple à construire (recommandé par un bon nombre d’associations) est le cuiseur de type panneaux aluminés Cookit.
2) Cuiseurs de type boîtes sont les plus simple à construire. Par contre, il ne faut pas être pressé. Souvent, il faut attendre plusieurs heures pour la cuisson. Ne nécessite aucune surveillance.
3) Le cuiseur solaire à réglage automatique sont complexes à construire et demandent de gros moyens financiers. Ils nécessitent une maitenance. Ils sont recommandés pour de grosses structures : écoles, dispensaires etc …
Il est recommandé pour tenir compte des améliorations, évolutions des modèles, nouveaux modèles de rester en relation avec les différents réseaux d’échanges d’informations sur le sujet, comme :http://solarcooking.org/ http://www.cuisinesolaire.com/
Pour ces questions, il y a vaincre de fortes résistances culturelles.Il y a une étude à faire au sujet de la résistance normale des mentalités face à ces innovations(Chapitre à étudier et à compléter).
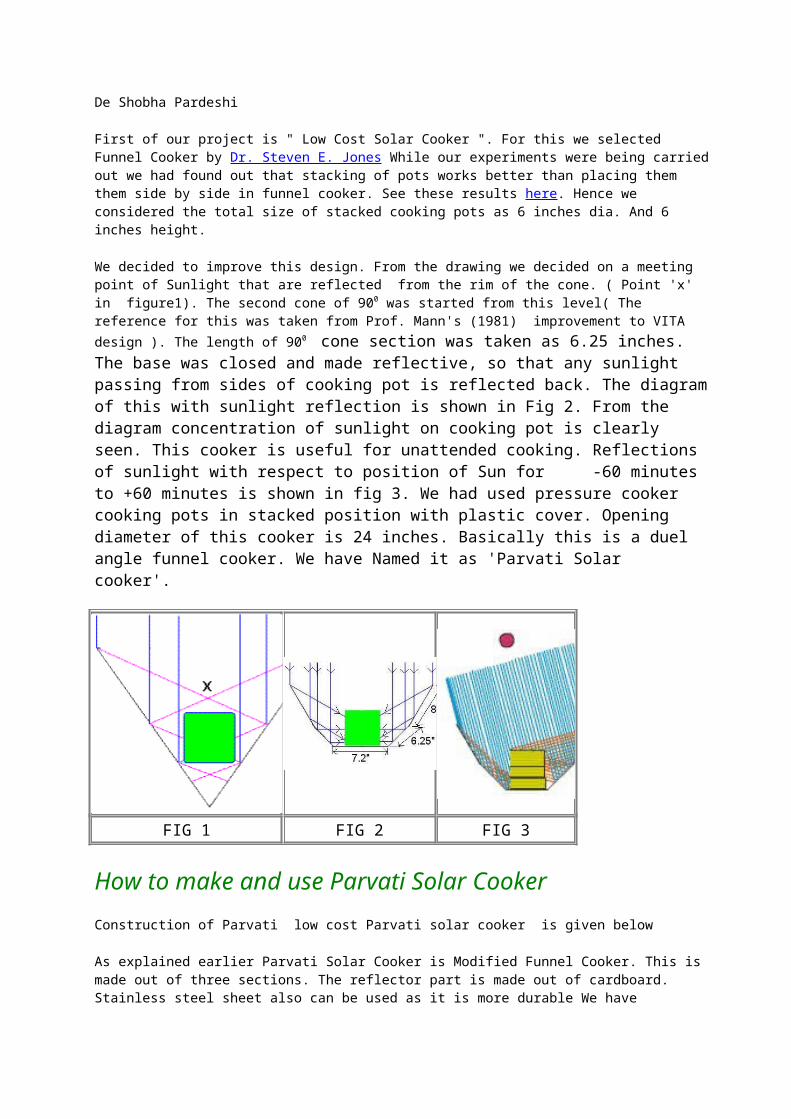
Par ailleurs, le temps, en montagne, ne permet pas toujours d'utiliser ce genre de fours...L’été, il peut y avoir des vents violents soudains, des vents de sable, de fort orage et fortes grêles. L’hiver, il peut y avoir de la neige et des tempêtes. Ces mauvaises conditions climatiques peuvent contribuer à gondoler, renverser, détruire, casser les cuiseurs solaires. « La population n'est pas fortement intéressée. La plupart utilise le gaz » (source : M. Askarray).
17 Bibliographie et autres sites web
1) Cuiseurs de HEOL :
http://generationsfutures.chez.tiscali.fr/obj_vertueux/heol.htm
1) Cuiseurs solaires de CARE Haïti :
http://www.rehred-haiti.net/membres/bme/synergie/numero5/cuiseurs.html
3) Cuiseur de l’Association française FÉEDA (FORMATION et ÉDUCATION à L'ENVIRONNEMENT et au DÉVELOPPEMENT APPROPRIÉ) :
http://www.feeda.org/index_fr.htm
4) L’assocation néerlandaise Kozon préconise le Cookit (voir plus haut) :http://www.kozon.org/
5) autre modèle de cuiseur :

http://flore99.free.fr/main2.html
6) Ce site répertorie d’autres cuiseurs :
http://home.planet.nl/~worldsolareconomy/Frans.htm
7) Cette association « les Enfants de Kaidara » agit au Mali :
http://lesenfantsdekaidara.free.fr/typeFourSolaire.html
9) Actions de la Commission Nationale de la Francophonie (CNF Sénégal) :http://www.francophonie.sn/1science.asp
10) Cuiseurs en bois de Enfance Actions Madagascar :
http://www.web-asso.org/eam/fichiers/projets.htm
11) site suisse sur les fours et cuiseurs solaires (présente les 3 types de cuiseurs ou fours) :
http://www.cuisinesolaire.com/ http://www.cuisinesolaire.com/F/troistypes.htm
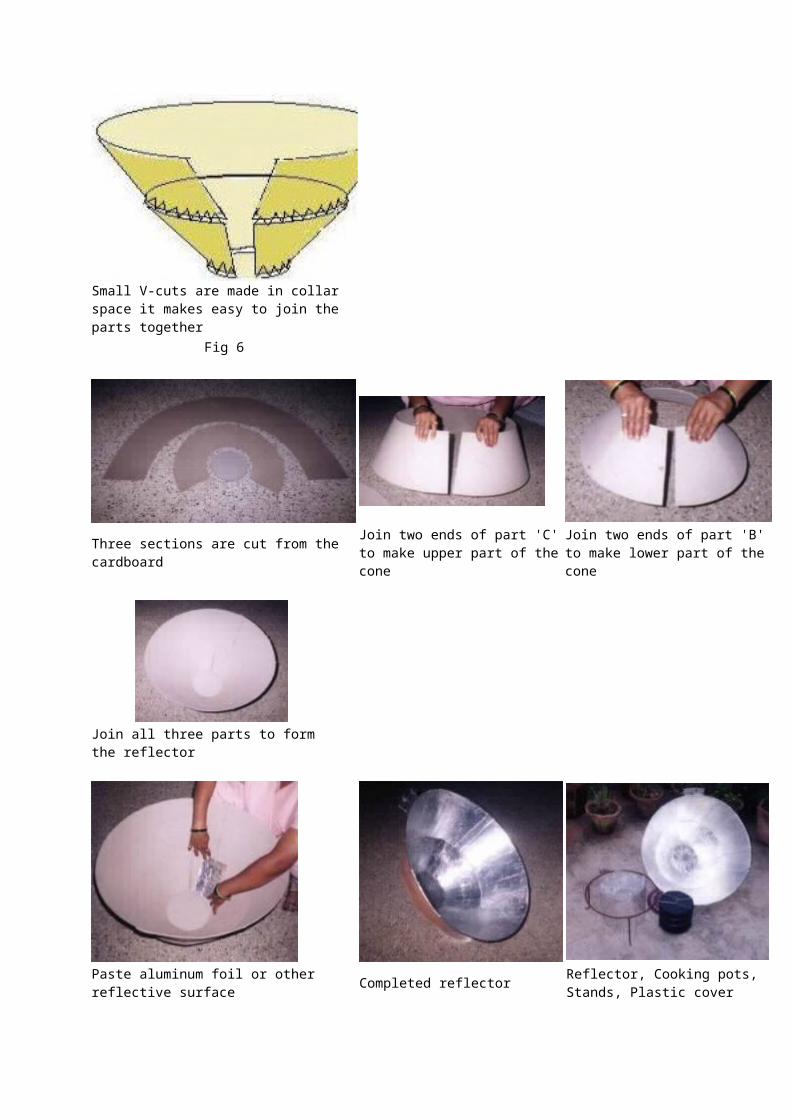
Ancien foyer berbère. Source : http://www.cyber-berbere.com/infosdesert.htm